Author Archives: Ajitesh Kumar
Configure Bitbucket Webhook to Trigger Jenkins Builds on AWS EC2
This article represents steps required to configure BitBucket Webhook to trigger Jenkins Builds on AWS EC2 based on code committed in the repository. This essentially means that a code commit in the BitBucket code repository would trigger a build in Jenkins server running on AWS EC2 machine. This forms the starting point of continuous delivery pipeline. The jenkins build, when triggered as a result of code push, could perform tasks such as some of the following: Run the build, Run tests Publish build artifacts in artifactory Deploying the build artifacts in different environments including QA, UAT and production. Please feel free to comment/suggest if I missed to mention one or …
How to Setup Jenkins & GitLab using Docker Containers
This article represents code sample on how to setup Jenkins & GitLab using Docker containers. Please feel free to comment/suggest if I missed to mention one or more important points. Also, sorry for the typos. Create a docker compose file such as docker-compose.yml with the code given below. Executing command such as “docker-compose up” would lead to creation of two containers, one of which hosts the Jenkins and another one hosts GitLab. The Jenkins can be accessed with URL such as http://localhost:28080. The GitLab can be accessed using URL such as http://localhost. In case of running this docker-compose file on Linux/Ubuntu, change the volume under jenkins from “- /usr/local/bin/docker:/usr/bin/docker” to “- …
Angular – Reactive or Template-driven Forms?
This article represents quick introduction to two different kind of forms which can be created in Angular 2 or Angular 4. Please feel free to comment/suggest if I missed to mention one or more important points. Also, sorry for the typos. Following are the key points discussed later in this article: Template-driven forms Reactive forms Template-driven forms Template-driven forms are the most trivial type of form that can be quickly created in Angular 2. Following are key aspects of creating template-driven form. These forms are asynchronous in nature. These forms require inclusion/import of FormsModule in the root module, AppModule which is placed in the root folder of the app. Following …
Top 5 Performance So-called Concerns of Meteor JS
Many working with Meteor JS wonders about performance concerns associated with Meteor JS. This blog points some of those concerns and represents my opinion on why they are invalid concerns. Database as a Bottleneck Inability to handle heavy read-write loads, especially, write load/performance; However, with latest releases of MongoDB, MongoDB is good enough to easily handle very large data requirements of read/write. Following are related details: MongoDB supports different techniques to scale out appropriately based on the read-write requirements. They are as following: Secondary reads (reads from slaves, writes from primary/master). Sharding techniques MongoDB (3.0+) has come up with new storage engine, WiredTiger, which supports document-level concurrency control for write …
Top 9 Reasons to Choose Meteor JS for Mobile App
This blog represents top 9 reasons due to which one could still go with or choose or adopt Meteor JS to develop his/her next mobile app. Higher Developers’ Productivity owing to Quicker Releases Keeping in mind how quickly apps can be developed, tested and released, Meteor can still be preferred choice due to some of the following reasons: Ease of programming as Javascript is used on both frontend and backend. This could prove very beneficial and cost-effective for business to find JS developers and train them appropriately to develop full-stack app with Meteor. Ease of collaboration within team as developers have similar concerns to take care. Full-stack Javascript framework …
6 Key Elements of DevOps based Software Development
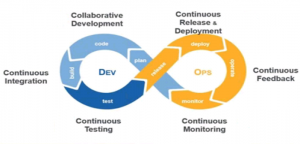
This article represents key aspects of DevOps approach which can be used to achieve continuous delivery/continuous deployment of software unit thereby achieving key business object of low-time-to-market and competitive edge. Please feel free to comment/suggest if I missed to mention one or more important points. Also, sorry for the typos. List of 6 Cs which are core to DevOps Approach Following diagram represents key aspects in achieving continuous delivery/deployment of a software unit while working based on DevOps approach. Collaborative Development Continuous Integration Continuous Testing Continuous Deployment or Release Continuous Feedback Continuous Monitoring
AWS – Steps to Achieve Continuous Delivery of Microservices Containers
This article enlists the key steps that would be required to create a continuous delivery setup for pushing cloud-native app (microservices with Docker containers) on AWS Cloud platform. Each of the points listed below will be detailed in separate blogs. Setup Jenkins with Git Setup Springboot microservices within Docker container Integrate Jenkins with AWS EC2 Container Registry (ECR) Setup AWS EC2 Container Service (ECS) Setup ECS Cluster with one EC2 instance Create ECS with a task definition and ELB (Elastic Load Balancer) Setup Setup a Web app using microservices Following apps/tools will be used to achieve above objective: Jenkins Git Springboot microservices Docker Containers AWS cloud services such as ECR, ECS, …
Spring Boot Web Application with Eclipse in 5 Clicks
This article represents tips and code samples to get you started quickly with Spring web application within few clicks. Please feel free to comment/suggest if I missed mentioning one or more important points. Also, sorry for the typos. Steps to get started with Spring Boot Web Application Go to Help > Eclipse Marketplace… and search type “spring sts” in Find text field under Search tab. Install the entry with the title such as “Spring Tool Suite (STS) for Eclipse Release”. Once installed, you would be asked to restart the Eclipse. Go ahead and restart the eclipse. Open the new Project selector window using shortcut, CTRL + N. Type “Spring Starter” …
Top 6 Freelance Jobs Websites for 2016-2017
This article represents top 6 websites (for the year 2016-2017) where job seekers could find freelance jobs, assignments or projects. Those working in IT and software industry (especially web or UI/UX developers and designers) will find them very useful. Please feel free to comment/suggest if I missed to mention one or more important websites. Also, sorry for the typos. Top 5 Freelance Websites List Following is the list of website (in order) Upwork Fiverr Freelancer Guru FlexJobs PeoplePerHour Find below the Google Trends on above websites:
AngularJS, Angular-UI Router Hello World Starter App – Code Sample
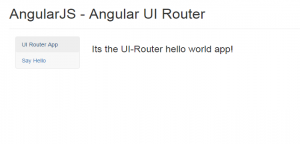
This article represents code samples to get started with an AngularJS app with Angular UI-Router and Bootstrap. Please feel free to comment/suggest if I missed to mention one or more important points. Also, sorry for the typos. Code Example – AngularJS 1, Angular UI-Router, Bootstrap Pay attention to some of the following in the code given below: Angular-UI router state information is used to associate links with templates Angular-UI code with within tag element “ui-view” to load specific views <!DOCTYPE html> <head> <title>My AngularJS App</title> <link rel=”stylesheet” href=”https://maxcdn.bootstrapcdn.com/bootstrap/3.3.7/css/bootstrap.min.css” integrity=”sha384-BVYiiSIFeK1dGmJRAkycuHAHRg32OmUcww7on3RYdg4Va+PmSTsz/K68vbdEjh4u” crossorigin=”anonymous”> </head> <body ng-app=”myApp” class=”container”> <div class=”page-header”> <h1>Angular 1 – Angular UI Router</h1> </div> <div class=”container-fluid”> <div class=”row”> <div class=”col-sm-3 col-lg-2″> …
Microservices, Continuous Delivery & AWS Cloud – Part 1
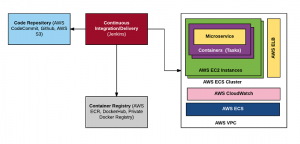
This article represents details on how would the technology architecture look like when dealing with continuous delivery of microservices containers (Dockers) on AWS Cloud. Please feel free to comment/suggest if I missed to mention one or more important points. Also, sorry for the typos. Following are the key points which will be dealt with, in this and the following article (part 2): Technology architecture building blocks Technology architecture description Technology team and required skillsets In this article, we shall look into key technology architecture building blocks. In second part of the series, we shall look into steps needed to be configured to achieve the continuous delivery of microservices containers into AWS cloud …
When a Spark application starts on Spark Standalone Cluster?
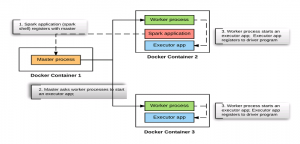
This article represents detailed view on what happens when a driver program (spark application) is started on one of the worker node when working with Spark standalone cluster. Please feel free to comment/suggest if I missed to mention one or more important points. Also, sorry for the typos. Following are the key points described later in this article: Snapshot into what happens when Spark Standalone Cluster Starts? Snapshot into what happens when a spark application (Spark Shell) starts on one of the worker nodes? Snapshot into what happens when a spark application (Spark Shell) stops on the worker node? Snapshot into what happens when Spark Standalone Cluster Starts? In our …
Fixed – Docker Compose & Invalid Volume Specification
This blog presents solution to the error “Invalid Volume Specification” when executing “docker-compose up” command. I got the error when the volume specification in docker-compose.yml file looks like following: volumes: – ./conf/spark-master:/conf – ./data:/tmp/data Following is how error may look like: ERROR: for spark-master Cannot create container for service spark-master: Invalid bind mount spec “c:\\Users\\ashukla\\dockers\\spark\\conf\\spark-master:/conf:rw”: Invalid volume specification: ‘c:\Users\ashukla\dockers\spark\conf\spark-master:/conf:rw’ ←[31mERROR←[0m: Encountered errors while bringing up the project. The solution to this is following: Save a file named as “.env” in the same folder as docker-compose.yml Save the following in “.env” file: COMPOSE_CONVERT_WINDOWS_PATHS = 1
Hello World with Apache Spark Standalone Cluster on Docker
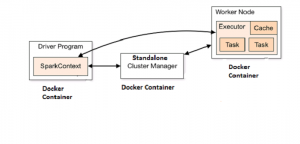
This article presents instructions and code samples for Docker enthusiasts to quickly get started with setting up Apache Spark standalone cluster with Docker containers. Thanks to the owner of this page for putting up the source code which has been used in this article. Please feel free to comment/suggest if I missed to mention one or more important points. Also, sorry for the typos. Following are the key points described later in this article: Basic concepts on Apache Spark Cluster Steps to setup the Apache spark standalone cluster Code sample for Setting up Spark Code sample for Docker-compose to start the cluster Code sample for starting the Driver program using Spark …
Why consider using Guava-like Libraries for API Contract Conditions Checks
This article represents a perspective on why one should consider using Pre/Post condition checks libraries rather than writing it down time and again in their code. While doing code reviews, many a times, I have found people using preconditions checks such as “Not Null” in a casual manner rather than based on API contracts requiring pre and post conditions checks. Such checks, at times, do make code difficult to read, learn or understand. One may want to rather use home-grown or external (proven ones) libraries for doing such checks. Not only does it enhance code readability and learn-ability but also, it does make you aware of contracts you put in the code thereby including only necessary checks and, …
Java – How to Fix java.lang.NoClassDefFoundError?
This article represents tips on How to Fix java.lang.NoClassDefFoundError when compiling a particular Java file. Please feel free to comment/suggest if I missed to mention one or more important points. Also, sorry for the typos. Following are the key points described later in this article: How to reproduce java.lang.NoClassDefFoundError? Why does the java.lang.NoClassDefFoundError occur in the first place? How to Fix the Error? How to reproduce java.lang.NoClassDefFoundError? Take a look at following Class file. package com.test; public class HelloWorld { public static void main(String[] args) { System.out.println(“Hello World! How are you?”); } } Following are steps to reproduce the java.lang.NoClassDefFoundError. Save the above file as HelloWorld.java within any folder. Compile …

I found it very helpful. However the differences are not too understandable for me