This article represents concepts related to Kubernetes Namespace and how to create/delete the namespaces. The following topics are discussed in this article:
- What are namespaces?
- How to create namespaces?
- How to work with namespaces?
- How to delete namespaces?
What are Namespaces?
Kubernetes namespace can be seen as a logical entity used to represent cluster resources for usage of a particular set of users. This logical entity can also be termed as a virtual cluster. One physical cluster can be represented as a set of multiple such virtual clusters (namespaces). The namespace provides scope for names. Names of resource within one namespace need to be unique.
By default, Kubernetes starts with the following three namespaces:
- Default: Catch-all namespace for all objects not belonging to kube public or kube system namespace. The default namespace is used to hold the default set of Pods, Services, and Deployments used by the cluster.
- Kube-public: Namespace for resources which are publicly available/readable by all
- Kube-system: Namespace for objects/resources created by Kubernetes system
The following command can be used to get a list of all namespaces:
kubectl get namespaces
The following command displays namespace with labels
kubectl get namespaces --show-labels
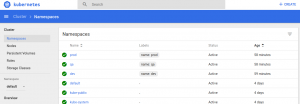
The namespaces list can be accessed in Kubernetes dashboard as shown in the diagram below:
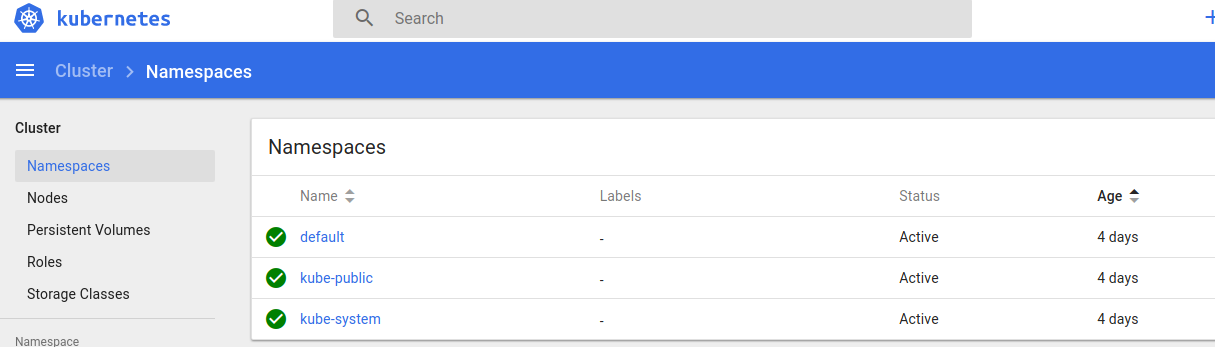
Figure 1. Kubernetes Namespaces
In real-world scenarios, one can create namespace for development (dev), testing (QA) and production (prod) environment. The objects in dev/QA namespace such as pods, services, and deployments will be available for developers/testers respectively to build and run the applications. There will be lesser restrictions on modifying the resources in dev/QA namespaces. In production (prod) namespace, there will be greater control on who could manage the resources.
In this article, we will look into creation/deletion of the namespaces for dev/QA/prod.
How to Create Namespaces?
Let’s create namespaces for development/QA/prod environments. The following would be required to be done:
- Create JSON files representing namespaces
- Execute kubectl command for creating namespaces
Create JSON files representing Namespaces
Development Namespace: Save the filename as namespace-dev.json.
{
  "kind": "Namespace",
  "apiVersion": "v1",
  "metadata": {
    "name": "dev",
    "labels": {
      "name": "dev"
    }
  }
}
QA Namespace: Save the filename as namespace-qa.json
{
  "kind": "Namespace",
  "apiVersion": "v1",
  "metadata": {
    "name": "qa",
    "labels": {
      "name": "qa"
    }
  }
}
Production Namespace: Save the filename as namespace-prod.json
{
  "kind": "Namespace",
  "apiVersion": "v1",
  "metadata": {
    "name": "prod",
    "labels": {
      "name": "prod"
    }
  }
}
Execute Kubectl Command for Creating Namespaces
The following commands create namespaces for Dev/QA/Prod environments:
# Namespace for Developers
kubectl create -f namespace-dev.json
# Namespace for Testers
kubectl create -f namespace-qa.json
# Namespace for Production
kubectl create -f namespace-prod.json
Check whether the namespaces got created by executing the following command:
kubectl get namespaces --show-labels | grep name=
The following represents the output of above command:

Figure 2. kubectl get namespace details
One can also check the details of newly created namespaces by accessing dashboard:

Figure 3. kubernetes dashboard displaying newly created namespaces
How to Work with Namespaces?
Once the namespaces have been created, in order to have kubectl commands work with a specific namespace, the following needs to be done:
- Assign a context to each namespace
- Switch to appropriate context for working with that namespace
Assign a context to each namespace
# Assign dev context to development namespace
kubectl config set-context dev --namespace=dev --cluster=minikube --user=minikube
# Assign qa context to QA namespace
kubectl config set-context qa --namespace=qa --cluster=minikube --user=minikube
# Assign prod context to production namespace
kubectl config set-context prod --namespace=prod --cluster=minikube --user=minikube
Switch to appropriate context
Execute the following commands to switch to the specific context. Once switched to a context, any execution of kubectl command would create/update/delete objects in that namespace.
# Switch to Dev context
kubectl config use-context dev
# Switch to QA context
kubectl config use-context qa
# Switch to Prod context
kubectl config use-context prod
Just to check what is current context, execute the following command:
kubectl config current-context
Once switched to a context, commands such as following would give objects detail for that namespace:
kubectl get pods
kubectl get deployments
How to Delete Namespace?
The command below would delete the namespaces.
# Delete dev namespace
kubectl delete namespaces dev
# Delete qa namespace
kubectl delete namespaces qa
# Delete prod namespace
kubectl delete namespaces prod
The above commands execute in asynchronous mode. Thus, the status of the namespace would show up as terminating until the deletion gets completely deleted.

Check out my latest book titled as First Principles Thinking: Building winning products using first principles thinking.
- Mathematics Topics for Machine Learning Beginners - July 6, 2025
- Questions to Ask When Thinking Like a Product Leader - July 3, 2025
- Three Approaches to Creating AI Agents: Code Examples - June 27, 2025
Excellent post and blog too, i recommend to you use https://disqus.com/ for better box comment.
THANKS!