This article represents instructions and related concepts on how to install QISKit (Quantum Information Science Kit) using PIP. As per Wikipedia Page on PIP, PIP is a package management system used to install and manage software packages written in Python. This article assumes that you are working with Linux distributions (distros) OS such as Ubuntu etc.
The following topics are discussed in this article:
- What is QISKit
- Install Python PIP
- Install QISKit using PIP Install Command
- Test First Quantum program
What is QISKit?
QISKit is a software development kit (SDK) comprising of Python-based software libraries that can be used to create quantum computing programs, compile them, and execute them on one of several backends (online Real quantum processors, and simulators).
Install Python PIP
Execute the following command to install Python PIP:
sudo apt install python-pip
Just to make sure that PIP installation went fine, execute following command to check the PIP version:
pip --version
Install QISKit using PIP Install Command
Install QISkit using PIP install command such as following:
pip install qiskit
As I executed above command, I got the following error:
Could not find a version that satisfies the requirement qiskit (from versions: ) – No matching distribution found for qiskit
The possible reason can be that QISKit requires PIP to use Python of version 3.5 or later to install the QISKit packages. However, when I tried to install QISKit using pip install qiskit command, it tried to use python2.7 version. And, QISKit supports python 3.5.* and later versions. The same can be found on QISKit Github page or QISKit.org. The following are instructions related to how I went about fixing the problem of setting python to use python 3.5.* rather than python 2.7.*.
- On my machine, there were two versions of Python such as python 2.7 and python 3.5. This I found by executing the following command:
ls -l /usr/bin/python*
- Python command (python) was set to use python2.7 version. I figured out about python version by executing the command, python –version which printed Python 2.7.12.
python --version
- The goal is to set the python command to use python 3.5 and later version. Check the python version related to python 3.5.* by executing the command, python3 –version.
- Execute the following commands to set python to use python 3.5.* version.
# Executing the following command would list python versions
update-alternatives --list python
If the result is update-alternatives: error: no alternatives for python, execute following commands to set the installation alternatives of various python versions:
update-alternatives --install /usr/bin/python python /usr/bin/python2.7 1
update-alternatives --install /usr/bin/python python /usr/bin/python3.5 2
Execute the following command to check the python alternatives list:
update-alternatives --list python
The following would show up as part of the list:
- /usr/bin/python2.7
- /usr/bin/python3.5
Now, lets set the python to use python3.5 by executing the following command and selecting the appropriate option:
sudo update-alternatives --config python
Once done, check the python version by executing the command, python –version. It should print out something like Python 3.5.*.
- Once done with above, execute the command and the installation should happen successfully:
pip install qiskit
The following screenshots represent the same:
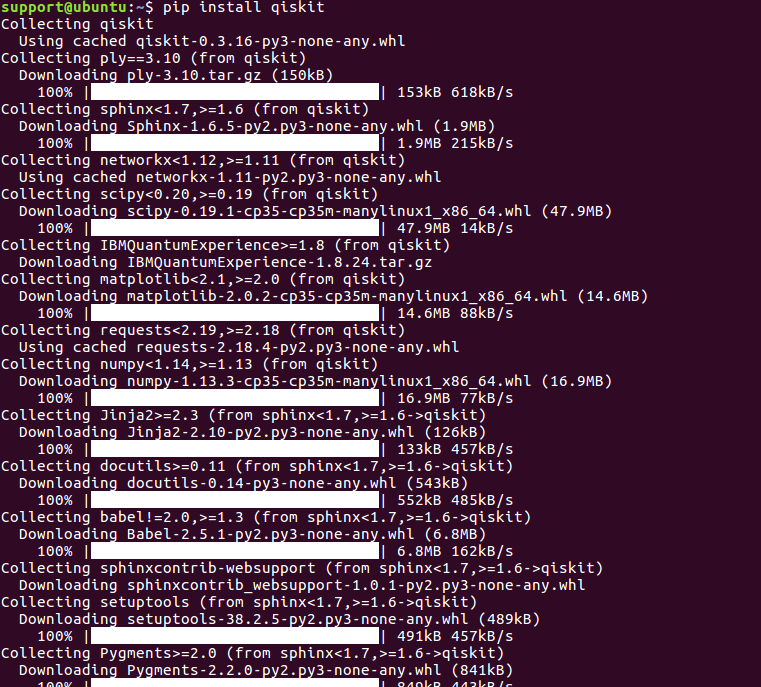
Figure 1. pip install qiskit command execution result

Figure 2. pip install qiskit execution – package information
Note some of the following libraries getting installed:
- IBMQuantumExperience-1.8.24
- qiskit-0.3.16
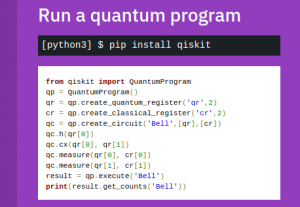
Test Your First Quantum Program
Save the following code in a file such as qc_hello.py
from qiskit import QuantumProgram
qp = QuantumProgram()
qr = qp.create_quantum_register('qr',2)
cr = qp.create_classical_register('cr',2)
qc = qp.create_circuit('Bell',[qr],[cr])
qc.h(qr[0])
qc.cx(qr[0], qr[1])
qc.measure(qr[0], cr[0])
qc.measure(qr[1], cr[1])
result = qp.execute('Bell')
print(result.get_counts('Bell'))
Run the above file with python command:
python qc_hello.py
Something such as following will get printed:
{'00': 527, '11': 497}
In case, you try with python program of earlier versions such as python2.7 (python2.7 qc_hello.py), you would get error like following:
Traceback (most recent call last):
  File "qc_hello.py", line 1, in <module>
    from qiskit import QuantumProgram
ImportError: No module named qiskit
References
- The detailed information on QISKit can be found on QISKit Website.
- QISKit Developer Resources
- QISKit Tutorials
- QISKit Documentation for working with OpenQASM and IBM-QX
- Github pages on QISKit.

Check out my latest book titled as First Principles Thinking: Building winning products using first principles thinking.
- Mathematics Topics for Machine Learning Beginners - July 6, 2025
- Questions to Ask When Thinking Like a Product Leader - July 3, 2025
- Three Approaches to Creating AI Agents: Code Examples - June 27, 2025
I found it very helpful. However the differences are not too understandable for me