The article lists down steps one need to take in order to get up and running with Spring MVC 4 and Hibernate 4. The article will describe following three key aspects:
- General configurations to setup Java, Eclipse and Tomcat Server
- Spring MVC 4 configurations & code samples
- Hibernate 4 configurations & code samples
Following are key components/artifacts that would be required to create the web application which makes use of Spring MVC 4 for managing MVC and Hibernate as an ORM framework:
- Libraries & Tools
- Configuration files
- Components
- Controller
- Views (JSP pages)
- Business logic classes
- Data access classes
Key Libraries & Tools
Following are key libraries and tools to download and get ready before start working apart from Java (used Java 7) :
- Libraries
- Spring MVC and related libraries (currently at version 4.0.3)
- Spring dependent libraries such as following:
- Commons-logging jar file
- Com.Springsource.org.aopalliance-1.0.0.jar
- Hibernate libraries (currently at version 4.3.5)
- Tools/Softwares
- Eclipse JavaEE Kepler
- Tomcat server (currently at version 8)
- A database such as MySQL
Key Configuration Files
Following are minimum required configuration files you would need to add in the WEB-INF folder:
- web.xml
- spring-servlet.xml (assuming you named dispatcher servlet in web.xml as “spring”)
- hibernate.cfg.xml
Web.xml
Note some of the following XML blocks in the code below:
- Spring configuration (Dispatcher Servlet)
- CSS/JS files
<?xml version="1.0" encoding="UTF-8"?>
<web-app xmlns:xsi="http://www.w3.org/2001/XMLSchema-instance"
xmlns="http://xmlns.jcp.org/xml/ns/javaee"
xsi:schemaLocation="http://xmlns.jcp.org/xml/ns/javaee http://xmlns.jcp.org/xml/ns/javaee/web-app_3_1.xsd"
id="WebApp_ID" version="3.1">
<display-name>HelloDynWebProject</display-name>
<welcome-file-list>
<welcome-file>index.jsp</welcome-file>
</welcome-file-list>

<!-- Spring Configuration -->

<servlet>
    <servlet-name>spring</servlet-name>
    <servlet-class>org.springframework.web.servlet.DispatcherServlet</servlet-class>
    <load-on-startup>1</load-on-startup>
</servlet>
<servlet-mapping>
    <servlet-name>spring</servlet-name>
    <url-pattern>/</url-pattern>
</servlet-mapping>
<context-param>
    <param-name>contextConfigLocation</param-name>
    <param-value>/WEB-INF/spring-servlet.xml</param-value>
</context-param>
<listener>
    <listener-class>org.springframework.web.context.ContextLoaderListener</listener-class>
</listener>

<!-- Config for accessing JS/CSS files from with JSP files -->

<servlet-mapping>
    <servlet-name>default</servlet-name>
    <url-pattern>*.css</url-pattern>
</servlet-mapping>
<servlet-mapping>
    <servlet-name>default</servlet-name>
    <url-pattern>*.js</url-pattern>
</servlet-mapping>
</web-app>
Spring-servlet.xml
<beans xmlns="http://www.springframework.org/schema/beans"
xmlns:context="http://www.springframework.org/schema/context"
xmlns:xsi="http://www.w3.org/2001/XMLSchema-instance" xmlns:p="http://www.springframework.org/schema/p"
xmlns:tx="http://www.springframework.org/schema/tx"
xsi:schemaLocation="
http://www.springframework.org/schema/beans
http://www.springframework.org/schema/beans/spring-beans-4.0.xsd
http://www.springframework.org/schema/context
http://www.springframework.org/schema/context/spring-context-4.0.xsd
http://www.springframework.org/schema/tx
http://www.springframework.org/schema/tx/spring-tx-4.0.xsd
http://www.springframework.org/schema/aop
http://www.springframework.org/schema/aop/spring-aop-4.0.xsd">

<!-- Configuration describing the package consisting of all components -->

<context:component-scan base-package="com.vf.restaurants" />

<!-- Configuration defining views files -->

<bean
class="org.springframework.web.servlet.view.InternalResourceViewResolver">
<property name="prefix">
<value>/WEB-INF/views/</value>
</property>
<property name="suffix">
<value>.jsp</value>
</property>
</bean>

<!-- Database-related Configuration to connect with database -->

<bean id="dataSource"
class="org.springframework.jdbc.datasource.DriverManagerDataSource"
p:driverClassName="com.mysql.jdbc.Driver" p:url="jdbc:mysql://localhost:3306/docdb"
p:username="root" p:password="root" />

<!-- Hibernate-related Configuration -->

<bean id="sessionFactory"
class="org.springframework.orm.hibernate4.LocalSessionFactoryBean">
<property name="dataSource" ref="dataSource" />
<property name="configLocation">
<value>/WEB-INF/hibernate.cfg.xml</value>
</property>
<property name="hibernateProperties">
<props>
<prop key="hibernate.dialect">org.hibernate.dialect.MySQLDialect</prop>
<prop key="hibernate.show_sql">true</prop>
</props>
</property>
</bean>

<!-- Transaction related configuration for working with database -->

<tx:annotation-driven />
<bean id="transactionManager"
class="org.springframework.orm.hibernate4.HibernateTransactionManager">
<property name="sessionFactory" ref="sessionFactory" />
</bean>

</beans>
Hibernate.cfg.xml
<?xml version='1.0' encoding='utf-8'?>
<!DOCTYPE hibernate-configuration PUBLIC
"-//Hibernate/Hibernate Configuration DTD//EN"
"http://hibernate.sourceforge.net/hibernate-configuration-3.0.dtd">

<hibernate-configuration>
<session-factory>
<mapping class="com.vf.restaurants.Doctor" />
</session-factory>
</hibernate-configuration>
Configuration Steps
Following are different steps (in detail) which would help you get up and running. General Configurations (Requisites)
- Download all the libraries and tools as mentioned above.
- Execute hello world in eclipse and make sure your Java and Eclipse installation is properly installed and configured.
- Make sure you have added Tomcat 8 server in the server tab that could be found in eclipse work bench. Configure as per following page to make sure you could start and stop the Tomcat from within eclipse. This is just for the ease of development in terms of quickly starting and stopping the server from within eclipse.
- Create a Dynamic Web Project namely, HelloDynWebProject, using eclipse. Create an index.jsp within WEB-INF folder. Print “helloworld” using index.jsp from a url after you started server from servers tab. The URL could look something like http://localhost:8080//. This can be done by right clicking on project and selecting Run as…Run on Server. This confirms that your Java, eclipse and Tomcat is working fine. Move to next step.
- Copy and paste spring and hibernate libraries along with dependent libraries within folder, WEB-INF/lib.
Spring MVC Configuration & Code Samples
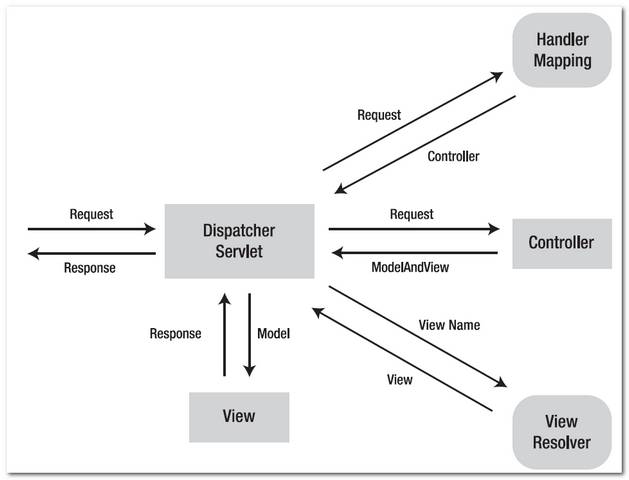
Before I go ahead describing several code samples & configurations, lets look at following diagram that describes request-response flow between views (JSPs pages) and controller classes.
Before representing the classes and describing them, lets take a look at the view, the hello.jsp file. Following is the code:
hello.jsp
<html>
<head>
<meta http-equiv="Content-Type" content="text/html; charset=ISO-8859-1">
<meta name="viewport" content="width=device-width, initial-scale=1.0">
<title>Insert title here</title>
<link rel="stylesheet" type="text/css" href="bootstrap/css/bootstrap.min.css">
<script src="bootstrap/js/bootstrap.min.js"></script>
</head>
<body>
<div class="container-fluid">
<div class="row-fluid">
<div class="span2">
<ul class="nav nav-list">
<li class="nav-header">Services</li>
<li class="active"><a href="#">New Restaurant</a></li>
</ul>
</div>
<div class="span10">
<form class="form-horizontal" method="post" action="/HelloDynWebProject/createdoc">
<fieldset>
<legend>New Doctor</legend>
<label>Name</label>
<input type="text" name="name" placeholder="">
<label>Address</label>
<input type="text" name="address" placeholder="">
<div class="control-group" style="padding-top:20px">
<button type="submit" class="btn">Submit</button>
</div>
</fieldset>
</form>
</div>
</div>
</div>

</body>
</html>
After creating view file, create the controller class and related components (typical ones) such as following:
- NewDoctorController
- NewDoctor
- Doctor
- DoctorDAO
NewDoctorController
Pay attention to some of the following (primarily annotations) in the controller class code such as @Controller, @AutoWired. For now, you could add a dummy method addDoctor in DoctorDAO to complete the flow.
@Controller
public class NewDoctorController {

	@Autowired
	private NewDoctor newDoc;

	@RequestMapping(value = "/newdoc", method = RequestMethod.GET)
	public ModelAndView createDoctor( ModelMap model ) {
		return new ModelAndView("hello");
	}

	@RequestMapping(value = "/createdoc", method = RequestMethod.POST)
	public String createNewDoctor(Doctor doctor, ModelMap model) {

		model.addAttribute("message", "Spring 3 MVC Hello World");
		newDoc.addDoctor(doctor);
		return "hello";

	}

}
Doctor
Doctor class acts as a domain object that also maps to the database table which we will look into Hibernate section. Pay attention to following annotations.
@Entity
@Table(name = "doctor")
public class Doctor {

    @Id
    @Column(name="id")
    @GeneratedValue
    private Integer id;

	@Column(name="address")
	private String address;

	@Column(name="name")
	private String name;

	public Integer getId() {
		return id;
	}
	public void setId(Integer id) {
		this.id = id;
	}
	public String getAddress() {
		return address;
	}
	public void setAddress(String address) {
		this.address = address;
	}
	public String getName() {
		return name;
	}
	public void setName(String name) {
		this.name = name;
	}

}
NewDoctor
This is a class consisting of business logic. Pay attention to @Component and @AutoWired annotation.
@Component
public class NewDoctor {

	@Autowired
	private DoctorValidation docVal;
	@Autowired
	private DoctorDAO  docDAO;

	public NewDoctor() {
	}

	public DocResult addDoctor( Doctor doc ) {
		DocResult docResult = new DocResult();
		if( docVal.validated( doc ) ) {
			if( docDAO.persist( doc ) ) {
				docResult.setSuccess( true );
				docResult.setMessage( "success");
			}
		}
		return docResult;
	}

	public DoctorValidation getDocVal() {
		return docVal;
	}

	public void setDocVal(DoctorValidation docVal) {
		this.docVal = docVal;
	}

	public DoctorDAO getDocDAO() {
		return docDAO;
	}

	public void setDocDAO(DoctorDAO docDAO) {
		this.docDAO = docDAO;
	}

}
Once done adding above classes, go ahead and deploy the application. I would rather suggest you to do Debug as…Debug on Server and verify the request-response flow across different classes. Access the application at following link: http://localhost:8080/hellodynwebproject/newdoc. Enter the inputs and submit.
Hibernate Configuration & Code Samples
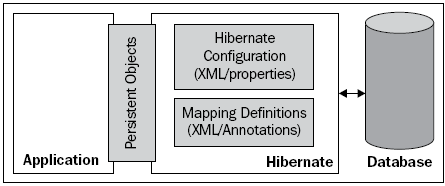
Following diagram represents two key aspects of hibernate configurations which is XML definitions for hibernate and mapping definitions (objects representing tables)
Add the hibernate.cfg.xml file (code shown above) within WEB-INF folder. Create a database with name as “docdb” and add following table:
CREATE TABLE IF NOT EXISTS `doctor` (
`id` int(10) NOT NULL AUTO_INCREMENT,
`name` varchar(100) NOT NULL,
`address` varchar(200) NOT NULL,
PRIMARY KEY (`id`)
) ENGINE=InnoDB DEFAULT CHARSET=latin1;
DoctorDAO
Create DoctorDAO class. Pay attention to annotations such as @Component, @Transactional and @Autowired.
@Component
@Transactional
public class DoctorDAO {

    @Autowired
    private SessionFactory sessionFactory;

	public boolean persist(Doctor doc) {
		sessionFactory.getCurrentSession().save(doc);
		return true;
	}

}
Once done with above coding and db creation, redeploy and test the application at http://localhost:8080/hellodynwebproject/newdoc. Add name and address and submit. Check if the data got added in the database.
Source Code for HelloDynWebProject
That is it! Let me know if you were able to get up and running using this article. Also, following is the link to download the eclipse project consisting of source code and config files. You may want to download Spring (& dependent) jars and Hibernate jars and put under WEB-INF/lib.
Source code for HelloDynWebProject
[adsenseyu1]
- Questions to Ask When Thinking Like a Product Leader - July 3, 2025
- Three Approaches to Creating AI Agents: Code Examples - June 27, 2025
- What is Embodied AI? Explained with Examples - May 11, 2025


I found it very helpful. However the differences are not too understandable for me