In this post, you will quickly learn about how to install mlxtend python package while you are working with Anaconda Jupyter Notebook.
Mlxtend (machine learning extensions) is a Python library of useful tools for the day-to-day data science tasks. This library is created by Dr. Sebastian Raschka, an Assistant Professor of Statistics at the University of Wisconsin-Madison focusing on deep learning and machine learning research.
Here is the instruction for installing within your Anaconda.
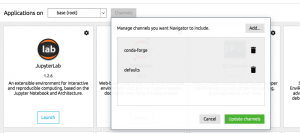
- Add a channel namely conda-forge by clicking on Channels button and then Add button.

Fig 1. Add Channel and Install Mlxtend using Conda Install
- Open a command prompt and execute the following command:
conda install mlxtend –channel Conda-forge - Once installed, launch a Jupyter Notebook and try importing the following. This should work fine.
from mlxtend.plotting import plot_decision_regions

I have been recently working in the area of Data analytics including Data Science and Machine Learning / Deep Learning. I am also passionate about different technologies including programming languages such as Java/JEE, Javascript, Python, R, Julia, etc, and technologies such as Blockchain, mobile computing, cloud-native technologies, application security, cloud computing platforms, big data, etc. I would love to connect with you on Linkedin.
Check out my latest book titled as First Principles Thinking: Building winning products using first principles thinking.
Check out my latest book titled as First Principles Thinking: Building winning products using first principles thinking.
Latest posts by Ajitesh Kumar (see all)
- Mathematics Topics for Machine Learning Beginners - July 6, 2025
- Questions to Ask When Thinking Like a Product Leader - July 3, 2025
- Three Approaches to Creating AI Agents: Code Examples - June 27, 2025
This doesn’t works for me. The command “conda install mlxtend –channel Conda-forge” failed. Instead, I used “pip install mlxtend”. Then I could successfully use the command “from mlxtend.plotting import plot_decision_regions” in the Jupiter Notebook.
Thanks for the comments, Jose.
Same here…. “pip install mlxtend” worked for me. Thanks a bunch
That command didnt work for me.
Run “conda install -c conda-forge mlxtend” and will work.