Hyperledger Fabric comes up with a script namely byfn.sh which can be used to Build Your First Network (byfn). Hyperledger Fabric script, byfn.sh (found in folder fabric-samples/first-network), can be used to build your first Hyperledger Fabric permissioned blockchain network.
As I went about writing the post, it got much longer. Thus, I have split the post into two parts. In the first part, you will learn about some of the following:
- A quick introduction to some of the following:
- Installation pre-requisites before getting started with byfn.sh execution
- Initial configuration prior to executing byfn.sh
- How to go about executing byfn.sh
- Deep dive into byfn.sh execution to learn key aspects of building a permissioned blockchain network such as following:
- Generating certificates used for identifying member organizations and authorizing transactions
- Generating channel artifacts
In the second part, you will learn about how to plan around conducting transactions in blockchain network vis-a-vis byfn.sh script.
Installation Pre-requisites before executing byfn.sh
Download Hyperledger Fabric platform-specific components/binaries before getting started with your first network using byfn.sh script. The instructions can be found on this page. Hyperledger Fabric Samples. The platform binaries get installed bin sub-directory of the current working directory. My current working directory is “/home/support/hyperledger”.
Initial configuration to be set before executing byfn.sh
First and foremost, the “hyperledger/bin” path needs to be set into PATH. Otherwise, you would hit with error such as cryptogen tool not found. exiting.
You may open up file such as ~/.bashrc and put the “hyperledger/bin” folder in the path. My hyperledger files such as cryptogen etc are found within the folder “/home/support/hyperledger/bin”
export PATH=$PATH:/home/support/hyperledger/bin
You could find related details on this page, Cryptogen Tool Not Found…Exiting.
Execute byfn.sh
- Download and setup Hyperledger Fabric samples from this page, Hyperledger Fabric Samples. I did it in my current working directory as “/home/support/hyperledger”. A folder fabric-samples gets created. Some of the following folders get downloaded within fabric-samples folder:
- first-network (folder consisting of byfn.sh to build first network)
- fabcar
- chaincode
- basic-network
- balance-transfer
- Go to folder, fabric-samples/first-network to build your first network.
- Execute one of the following commands (based on user permissions) such as following and you should be able to create your first permissioned blockchain network using Hyperledger Fabric.
./byfn.sh -m up
sudo ./byfn.sh -m up
Deep Dive into byfn.sh execution
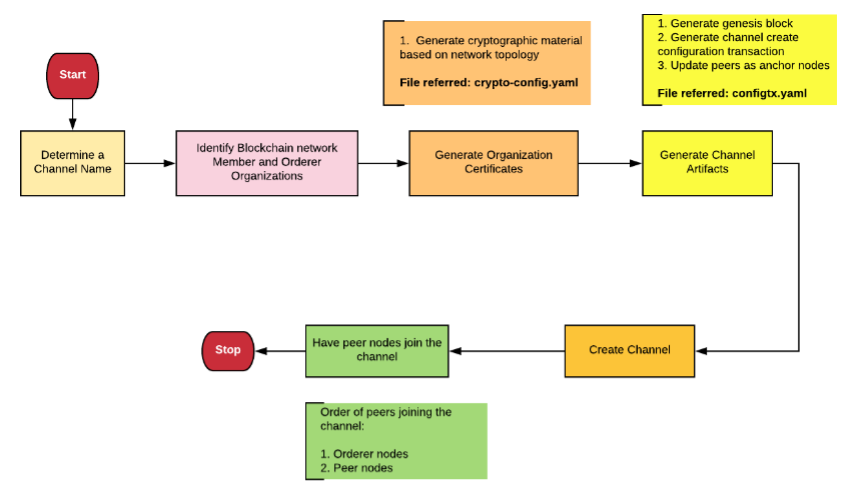
Let’s do a deep dive into what happens as a result of executing byfn.sh script. The information given below can be used as a guidelines/best practice for designing and developing your desired permission blockchain network. It is crucial to understand this as it would help in giving you a strong sense on how blockchain network can be created/operated using Hyperledger Fabric. The following diagram represents workflow related to creation of blockchain network using Hyperledger Fabric:

Figure 1. Hyperledger Fabric Blockchain Creation Workflow
It all starts with a Channel Name
As byfn.sh starts executing, a channel with default name as “mychannel” is created. Although trivial, this would be required for the network you build, the initial name of the channel. Any blockchain network created with Hyperledger Fabric is, basically, a channel. There can be additional channels (sub blockchain network), which two or more participants can join in conducting transactions in private. At any point, a blockchain network participant can be memeber of multiple channels. Each channel maintains its own ledger. And, ledgers of different channels are not shared although a member can maintain multiple ledgers belonging to different channels it joined.
Design Blockchain Network
The first step in building your blockchain network is determining/identifying the member organizations and the related nodes (peer/orderer nodes hosted by each org) which would comprise the network. The same can be observed as byfn.sh starts executing. During the start of execution, you could find the details such as following being displayed in console.log. The details can also be found in the file, “fabric-samples/first-network/configtx.yaml” which is used to create a channel and related artifacts (genesis block, channel creation transaction, anchor peers etc).
- The blockchain network is created as a channel.
- One orderer organization
- orderer.example.com
- Two member organizations having two peer nodes each; One member of each organization acts as an anchor peer.
- peer0.org1.example.com
- peer1.org1.example.com
- peer0.org2.example.com
- peer1.org2.example.com
- Identify anchor peer nodes for each organization which will take part in inter-organization interaction/gossip.
Generate Org Certificates
Once the blockchain network design including ordered and member organizations get frozen, the next step is to start preparing for creating the permissioned blockchain network. This is achieved by assigning identity certificates to the member orgs and their nodes which will be used to identify themselves and conduct transactions in the network. A library of X509 certificates (commonly termed as cryptographic material) gets created for organizations and associated orderer/peer nodes using the cryptogen tool. A unique root certificate (ca-certs) is created for organization which binds peers and orderers to that organization. Note that this is where cryptogen tool not found..exiting error occurs if cryptogen tool is not found in the path. The cryptogen tool is passed the file namely crypto-config.yaml which consists of network topology information for orderer and peer organization (name, domain, hostname) along with peer nodes information (count of peer nodes etc). Take a look at the “fabric-samples/first-network/crypto-config.yaml” file.
Generate Channel Artifacts
After the fact that certificates are created for member organizations and their nodes (orderer/peers), the next step is to create the blockchain artifacts. The utility configtxgen is used to create the blockchain (channel) artifacts. In case, the hyperledger/bin is not set in the path, one would run across the error, the configtxgn tool not found. exiting. As part of blockchain creation, the following artifacts get created in folder, channel-artifacts:
- Genesis block (for bootstrapping ordering system channel)
- Channel creation configuration transaction (channel.tx) representing creation of channel
- Anchor peers update transaction for updating a peer node as anchor peer.
Create Blockchain Network
Finally, its time to create the blockchain network. The blockchain network is created in following order. You would in the console log such as Channel “mychannel” created successfully, or PeerX joined on the channel, “mychannel”
- Ordering Service
- orderer.example.com
- Member Organization Nodes
- peer0.org1.example.com (Org1)
- peer1.org1.example.com (Org1)
- peer0.org2.example.com (Org2)
- peer1.org2.example.com (Org2)
- Peer nodes updated as anchor nodes
Further Reading
Summary
In this post, you learned about some of the following:
- Setting up Hyperledger Fabric platform components
- Setup Fabric samples
- Configure development environment for executing byfn.sh
- Executing byfn.sh
- Deep dive into execution of byfn.sh
- Determine/Design Blockchain network
- Create certificates for member organizations and their nodes
- Create blockchain (genesis block etc)
- Have peers join the Blockchain network (Default channel)
In the next post, we will learn about another aspect related with byfn.sh script such as conducting transactions on blockchain network.
Did you find this article useful? Do you have any questions about this article or creating your first permissioned blockchain network using byfn.sh? Leave a comment and ask your questions and I shall do my best to address your queries.
- Mathematics Topics for Machine Learning Beginners - July 6, 2025
- Questions to Ask When Thinking Like a Product Leader - July 3, 2025
- Three Approaches to Creating AI Agents: Code Examples - June 27, 2025
I found it very helpful. However the differences are not too understandable for me