Following are the key points described later in this article:
- Basic concepts on Apache Spark Cluster
- Steps to setup the Apache spark standalone cluster
- Code sample for Setting up Spark
- Code sample for Docker-compose to start the cluster
- Code sample for starting the Driver program using Spark Shell
- Running a HelloWorld Analysis on Cluster
- References
Basic concepts on Apache Spark Cluster
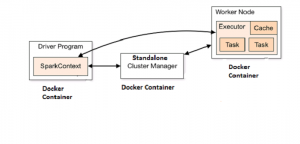
Read the text given on this page, Spark cluster mode overview to understand the fundamentals around how Spark runs on clusters. Make a note that, in this article, we are demonstrating how to run spark cluster using Spark’s standalone cluster manager. Following diagram depicts the setup described in this article.
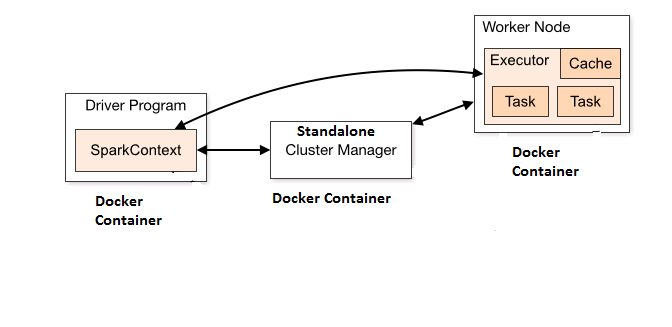
Spark Standalone Cluster Setup with Docker Containers
In the diagram below, it is shown that three docker containers are used, one for driver program, another for hosting cluster manager (master) and the last one for worker program. One could also run and test the cluster setup with just two containers, one for master and another for worker node. In that case, one could start the driver program (SparkContext) in either master or worker node by command such as spark-shell –master spark://192.168.99.100:7077. As a matter of fact, in client mode, the driver is launched in the same process as the client that submits the application. In cluster mode, however, the driver is launched from one of the Worker processes inside the cluster, and the client process exits as soon as it fulfills its responsibility of submitting the application without waiting for the application to finish.
In order to access the WebUI for driver program (spark-shell) running in worker node, one may need to add port such as “4041:4040” under worker node entry in docker-compose file and access using the URL as 192.168.99.100:4041.
That said, following different cluster managers are supported:
Steps to setup the Apache spark standalone cluster
Following steps need to be taken to test your first Spark program using spark shell as driver program.
- Setup the Spark image using the instructions for setting up the Spark as given below.
- Start the cluster using instructions given later in this article.
- Start the driver (spark shell) program in another container using the instructions given later in this article. As mentioned above, one could start the driver program (such as spark-shell) in master or worker node for testing purpose.
- And, you are all set.
Code sample for Setting up Spark
Note some of the following for setting up the image.
- Save the following file as spark.df.
- Go to the folder where you have saved the above mentioned spark.df file. Execute the command such as “docker build -f spark.df -t spark .”. Make a note that the image is tagged as “spark” and this is what is referenced in the docker-compose file whose code sample is presented later in this article. If you chose to use different tag name, make sure to change the image name in docker-compose file as well.
- Once completed, execute the command “docker images” to make sure you have got the image setup with name as “spark”.
FROM ubuntu:14.04

RUN apt-get -y update
RUN apt-get -y install curl
RUN apt-get -y install software-properties-common

# JAVA
RUN \
  echo oracle-java8-installer shared/accepted-oracle-license-v1-1 select true | debconf-set-selections && \
  add-apt-repository -y ppa:webupd8team/java && \
  apt-get update && \
  apt-get install -y oracle-java8-installer && \
  rm -rf /var/lib/apt/lists/* && \
  rm -rf /var/cache/oracle-jdk8-installer
ENV JAVA_HOME /usr/lib/jvm/java-8-oracle

ENV PATH $PATH:$JAVA_HOME/bin
# RUN curl -s --insecure \
#  --header "Cookie: oraclelicense=accept-securebackup-cookie;" ${JAVA_ARCHIVE} \
#  | tar -xz -C /usr/local/ && ln -s $JAVA_HOME /usr/local/java

# SPARK
ARG SPARK_ARCHIVE=http://d3kbcqa49mib13.cloudfront.net/spark-2.0.0-bin-hadoop2.7.tgz
ENV SPARK_HOME /usr/local/spark-2.0.0-bin-hadoop2.7

ENV PATH $PATH:${SPARK_HOME}/bin
RUN curl -s ${SPARK_ARCHIVE} | tar -xz -C /usr/local/

WORKDIR $SPARK_HOME
Code sample for Docker-compose to start the cluster
Make a note of following:
- SPARK_PUBLIC_DNS, in the code sample below, is set to IP Address of the virtual machine which is hosting the docker. Note that I did this set up on Windows OS. On Linux, it could just be 127.0.0.1
- Save the code given below in a file named as docker-compose.yml
- On a docker terminal, go to folder consisting of above saved file, docker-compose.yml and execute the command, “docker-compose up” to start the cluster.
- Once started, access the master node Web UI in browser using following URL: http://192.168.99.100:8080.
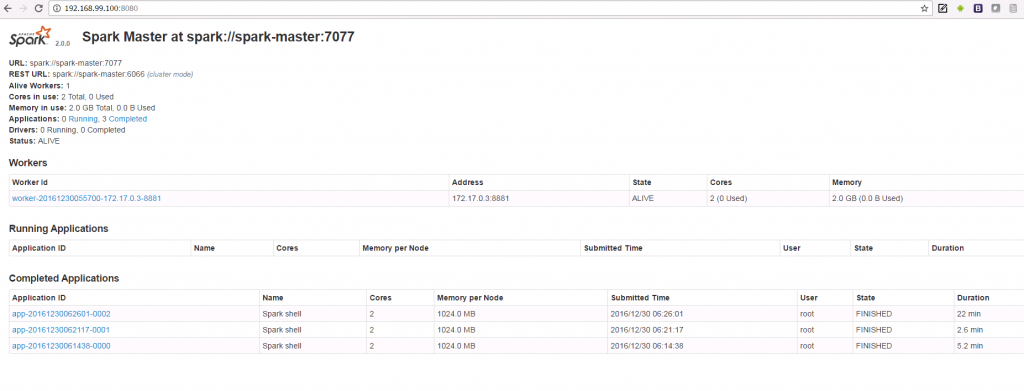
Accessing Spark Master Node WebUI while running on Dockers
- Access the worker node Web UI in a browser using following URL: http://192.168.99.100:8081

Accessing Spark Worker Node WebUI while running on Docker
Following is the code for docker-compose.
spark-master:
    image: spark
    command: bin/spark-class org.apache.spark.deploy.master.Master -h spark-master
    hostname: spark-master
    environment:
      MASTER: spark://spark-master:7077
      SPARK_CONF_DIR: /conf
      SPARK_PUBLIC_DNS: 192.168.99.100
    expose:
      - 7001
      - 7002
      - 7003
      - 7004
      - 7005
      - 7006
      - 7077
      - 6066
    ports:
      - 4040:4040
      - 6066:6066
      - 7077:7077
      - 8080:8080
    volumes:
      - ./conf/spark-master:/conf
      - ./data:/tmp/data

spark-worker-1:
    image: spark
    command: bin/spark-class org.apache.spark.deploy.worker.Worker spark://spark-master:7077
    hostname: spark-worker-1
    environment:
      SPARK_CONF_DIR: /conf
      SPARK_PUBLIC_DNS: 192.168.99.100
      SPARK_WORKER_CORES: 2
      SPARK_WORKER_MEMORY: 2g
      SPARK_WORKER_PORT: 8881
      SPARK_WORKER_WEBUI_PORT: 8081
    links:
      - spark-master
    expose:
      - 7012
      - 7013
      - 7014
      - 7015
      - 7016
      - 8881
    ports:
      - 8081:8081
    volumes:
      - ./conf/spark-worker-1:/conf
      - ./data:/tmp/data
NOTE: While executing “docker-compose up” command, you may get the error such as “Invalid Volume Specification“. The way to solve the problem is to create a file “.env” file in the same folder as docker-compose.yml and put this configuration in “.env” file (mind you, no whitespace around =) – COMPOSE_CONVERT_WINDOWS_PATHS=1
Code sample for starting the Driver program using Spark Shell
- Start a docker container using following command. Doing “docker ps” would display a container with name “driver”. Note the port “4041:4040”. This has been done because we have earlier used host 4040 port while setting up master.
docker run -it -p 8088:8088 -p 8042:8042 -p 4041:4040 --name driver -h driver spark:latest bash
- As you execute above, you get inside the docker container. Execute following command to start the spark shell (Driver) program – “spark-shell –master spark://IP:PORT”. Details in this relation could be found on this page.
spark-shell --master spark://192.168.99.100:7077
You should be able to see following in the terminal.

Starting Spark Shell Program within Docker Container
- Access the spark context Web UI in browser at URL, http://192.168.99.100:4041.
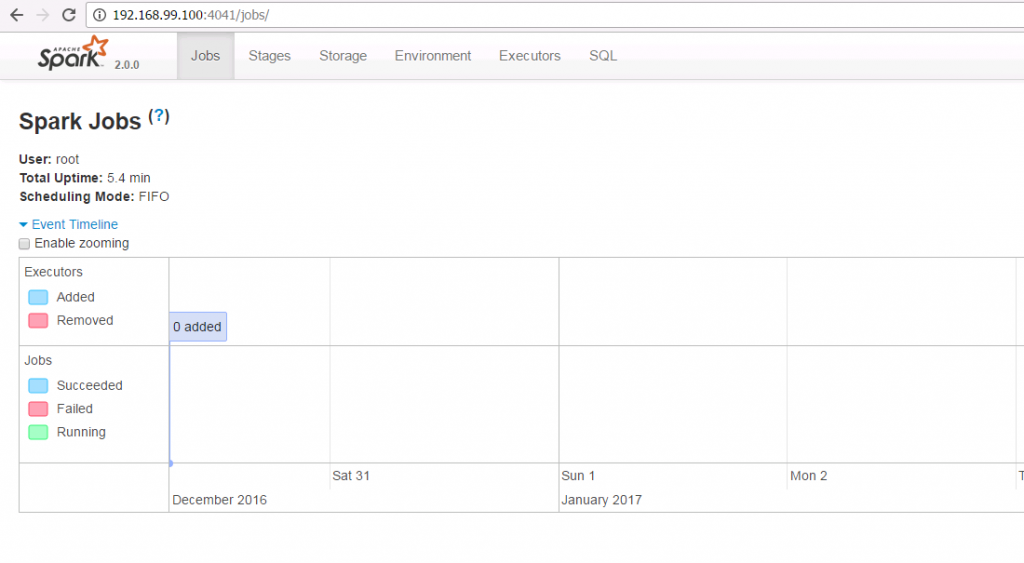
Accessing Spark Context WebUI Running on Docker
Running a HelloWorld Analysis on Cluster
Follow steps given below to run a “textFile” analysis in the cluster setup above where the driver program is created as another container (let’s call it as client or driver node) apart from two containers, one running a master and other a worker node.
- Create a file named as hellospark.txt within /home folder on both client (running driver program – spark shell in current case) and worker node. The file could be accessed with path. “/home/hellospark.txt”. If you do not do this, you would end up with exception such as FileNotFoundException or Invalid Input File Path Exception.
- Start the spark shell program on client node using the command such as following:
spark-shell --master spark://192.168.99.100:7077
This would start a spark application, register the app with master and have cluster manager (master) ask worker node to start an executor.
- Execute following commands to run an analysis:
val textFile = sc.textFile("/home/hellospark.txt") textFile.count() - Check the WebUI for master (192.168.99.100:8080) and worker (192.168.99.100:8081) to check the job details.
References
Following are some of the links which would prove useful and helpful and getting started:

Check out my latest book titled as First Principles Thinking: Building winning products using first principles thinking.
- Three Approaches to Creating AI Agents: Code Examples - June 27, 2025
- What is Embodied AI? Explained with Examples - May 11, 2025
- Retrieval Augmented Generation (RAG) & LLM: Examples - February 15, 2025
I found it very helpful. However the differences are not too understandable for me