
Last updated: 14th Aug, 2024
A random forest classifier is an ensemble machine learning model which is used for classification problems, and operates by constructing a multitude of decision trees during training, and, predicting the class label (of the data). In general, Random Forest is popular due to its high accuracy, robustness to overfitting, ability to handle large datasets with numerous features, and its effectiveness for both classification and regression tasks. Random Forest and Decision Tree classification algorithms are different, although Random Forest is built upon the concept of Decision Trees.
In this post, you will learn about the concepts of random forest classifiers and how to train a Random Forest Classifier using the Python Sklearn library.
What is a Random Forest Classifier? How does it Work?
A Random Forest Classifier is an ensemble machine learning algorithm that combines multiple decision trees for classification tasks centered around predicting class label of the dataset. It employs the concept of bagging (bootstrap aggregating) to improve accuracy and prevent overfitting.
Here is how random forest classifier works:
- Bagging and Creation of Decision Trees
- Training a random forest model starts by applying bagging, which involves creating multiple datasets from the original training data using bootstrap sampling (randomly selecting data points with replacement). Creating multiple datasets implies selecting multiple rows in the given dataset for training a decision tree. The hyperparameters such as max_samples in Sklearn RandomForestClassifier is used for this purpose given bootstrap is true. The number of datasets to be created depends upon maximum number of trees configured to be created. This is determined by parameter, n_estimators.
- For each of these datasets, a decision tree is constructed. These trees follow a series of “if-then” rules to split the data based on the features (color, size, etc.). Each split aims to maximize the purity of the resulting groups (apples in one, oranges in another).
- Random Feature Selection:
- In addition to bagging, each tree only considers a random subset of features at each split point. This injects randomness and prevents overfitting to the specific training data.
- Building the Trees and Making Predictions:
- Each tree is grown to the extent specified by max_depth hyperparameter. If max_depth hyperparameter is not specified, each of the tree is grown to the extent until all leaves are pure or all leaves contain samples lexx than the parameter min_samples_split.
- For a classification task, when making predictions, each tree in the forest gives a vote for a class. Continuing with our fruits example, when you encounter a new fruit, it’s passed through each decision tree in the forest. Each tree independently predicts the class (apple or orange) based on its internal rules.
- The final prediction is determined by aggregating the votes from all the trees. The class with the majority of votes is selected as the output.
The diagram below represents the above-mentioned steps:
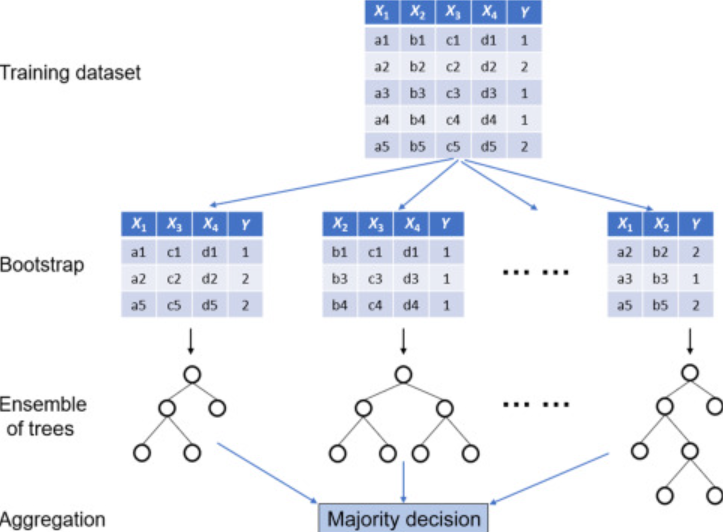
Note how random samples of data (using bootstrap sampling) with different feature set is taken and used to create decision trees of different sizes. This is why this set of trees is called random forest. The prediction is an aggregation of classification output from each of the decision trees.
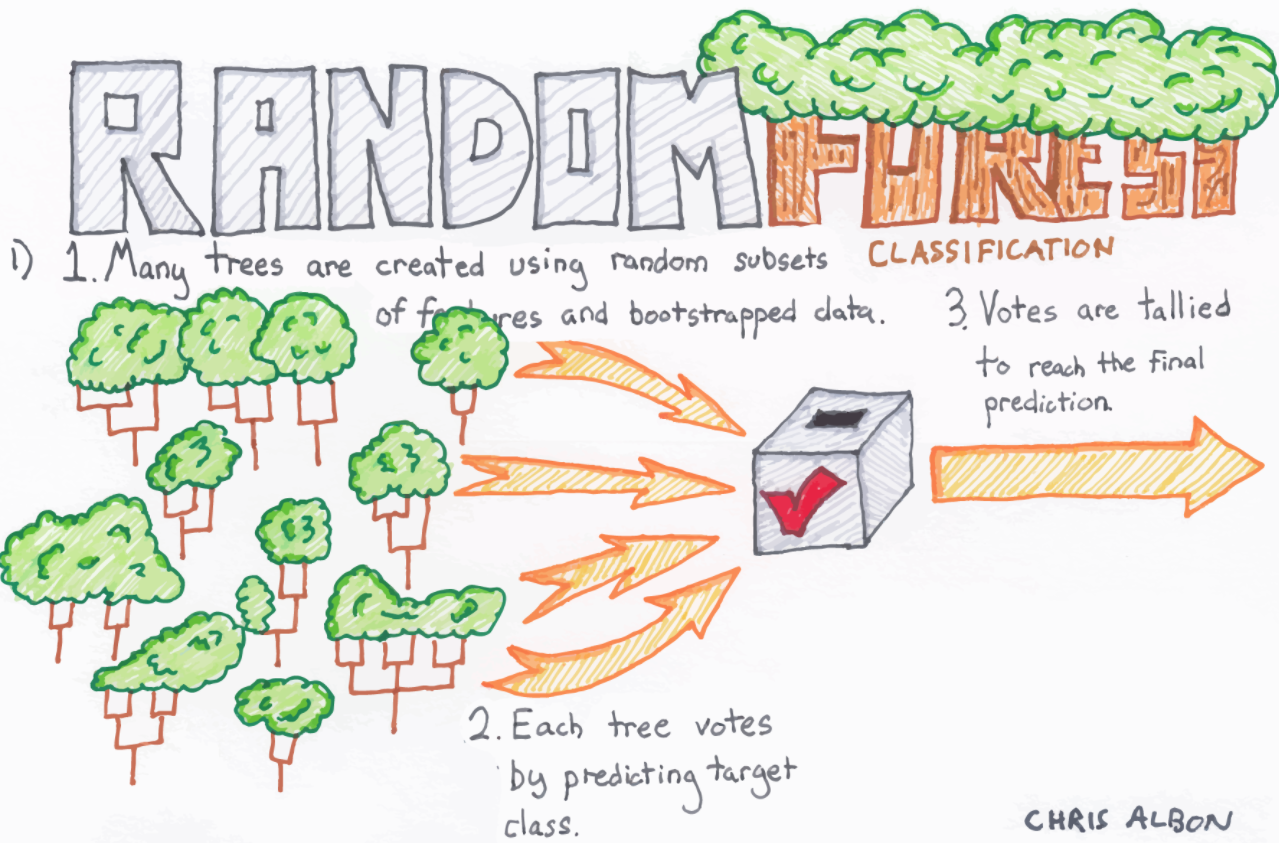
Here is another interesting image which I could find on the internet. Picture courtesy (Jinsol Kim page)
Random forest classifiers less likely to Overfit
Here is why random forest classifier is less likely to overfit:
- By employing bagging, where each decision tree is trained on a bootstrapped sample of the data, Random Forest ensures diversity among the trees, reducing the likelihood of overfitting.
- The creation of multiple decision trees, each based on a random subset of data and features, further enhances this effect. This randomness in data and feature selection prevents the model from relying too heavily on specific set of data and features, which can lead to overfitting.
- Finally, by averaging or taking a majority vote of the results from these multiple decision trees, Random Forest effectively reduces variance. This ensemble approach means that even if individual trees overfit, the aggregate prediction is more balanced and generalizable, making the overall classifier less prone to overfitting.
Random forest classifier – Hyperparameters Tuning
The following represents some of the hyperparameters that can be tuned for random forest classifiers:
- criterion: The function to measure the quality of a split. Supported criteria are “gini” for the Gini impurity and “entropy” for the information gain. Gini impurity is defined as the sum of the squared probabilities of each class, while information gain is defined as the decrease in entropy. In the case of random forest, a decrease in entropy can be understood as the increase in the purity of the node. In other words, the random forest tries to maximize the information gain at each node.
- max_depth: The maximum depth of the tree. If None, then nodes are expanded until all leaves are pure or until all leaves contain less than min_samples_split samples.
- min_samples_split: The minimum number of samples required to split an internal node.
- random_state: The random seed used to generate the random subsets of features and data.
- n_estimators: The number of decision trees in the random forest.
- max_features: The maximum number of features to consider when looking for the best split.
- max_samples: For bootstrap value to be true, maximum number of samples which will be used for training individual decision trees.
Advantages & Disadvantages of Random Forest Classifier
Advantages:
- Accuracy: By averaging predictions from multiple trees, Random Forest classifiers reduce variance and are less likely to overfit, making them more accurate than single decision trees.
- Robustness: Capable of handling missing values and outliers effectively, they are robust in various data conditions.
- Ease of Tuning: Despite multiple hyperparameters, they are relatively easier to tune for optimal performance.
Disadvantages:
- Training Time: They can be slow to train when not trained in parallel, particularly with large datasets or a high number of trees.
- Interpretability: The complexity of the ensemble model makes it difficult to interpret compared to simpler models like decision trees.
- Memory Usage: Requires more memory when not trained in parallel, which can be a constraint in resource-limited settings.
- Prediction Time: Although generally fast, prediction time can increase with the number of trees, affecting real-time applications.
Random Forest Classifier – Real-world Examples
The following are examples of some real-world applications where random forest classifier can prove to be useful:
Example 1: Email Spam Classification
- Imagine you have a dataset of emails labelled as spam or legitimate.
- A random forest classifier can learn from this data, building individual decision trees based on features like sender address, keywords, and writing style.
- When a new email arrives, it’s passed through each tree, receiving spam/legitimate predictions.
- The final classification is decided by the majority vote, giving you a more reliable prediction compared to a single decision tree. For example, If 223 out of 300 trees classify an email as spam, the forest classifies it as spam.
Example 2: Customer Churn Prediction
- Imagine you have customer data with features like demographics, purchase history, and support interactions.
- A random forest classifier can learn from this data to predict if a customer is likely to churn (stop using your service).
- This helps you target churn-prone customers with retention strategies, improving customer loyalty.
Example 3: Loan Application Approval
Consider a dataset for predicting whether a loan application should be approved or denied, based on features like income, credit score, employment history, etc.
- Through bagging, different subsets of the loan dataset are created, and a decision tree is built on each.
- One tree might end up focusing more on credit score, while another might give more weight to employment history, depending on the data subset and features selected.
- When a new loan application is passed through the random forest classifier, each tree makes an independent decision, and the final verdict is made based on the majority vote from all trees.
Random Forest Classifier – Sklearn Python Code Example
Here are the steps that can be followed to implement random forest classification models in Python:
- Load the required libraries: The first step is to load the required libraries. We will need the random forest classifier from scikit-learn and NumPy.
- Import the dataset: Next, we will import the dataset. For this example, we will use the iris dataset that is included in scikit-learn. This dataset contains 150 samples of irises, each of which has four features: sepal length, sepal width, petal length, and petal width. The goal is to predict the species of iris-based on these four features.
- Split the dataset into training and test sets: We will split the dataset into training and test sets. We will use 70% of the data for training and 30% for testing.
- Train the model on the training set: Next, we will train the random forest classifier on the training set.
- Make predictions on the test set: Finally, we will make predictions on the test set and evaluate the accuracy of our model.
- Hyperparameter tuning: Once we have a basic model working, we can improve its performance by tuning the hyperparameters.
Here is the code sample for training Random Forest Classifier using Python code. Note the usage of n_estimators hyperparameter. The value of n_estimators as
import matplotlib.pyplot as plt
from sklearn import datasets
from sklearn.model_selection import train_test_split
from mlxtend.plotting import plot_decision_regions
from sklearn.metrics import accuracy_score
from sklearn.ensemble import RandomForestClassifier

#
# Load IRIS data set
#
iris = datasets.load_iris()
X = iris.data[:, 2:]
y = iris.target

#
# Create training/ test data split
#
X_train, X_test, y_train, y_test = train_test_split(X, y, test_size=0.3, random_state=1, stratify=y)

#
# Create an instance of Random Forest Classifier
#
forest = RandomForestClassifier(criterion='gini',
                                 n_estimators=5,
                                 random_state=1,
                                 n_jobs=2)
#
# Fit the model
#
forest.fit(X_train, y_train)

#
# Measure model performance
#
y_pred = forest.predict(X_test)
print('Accuracy: %.3f' % accuracy_score(y_test, y_pred))
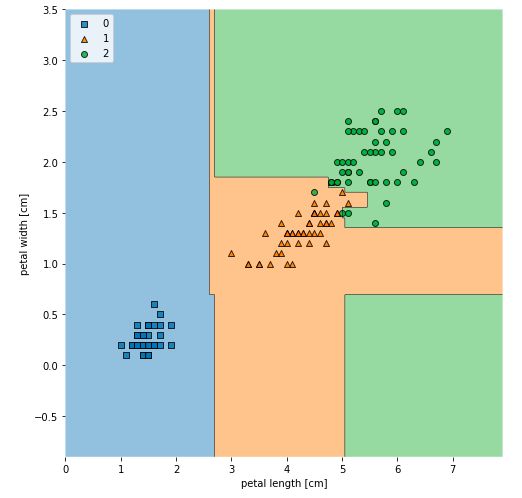
The model performance comes out to be 97.8%. Here is what the decision regions will look like after plotting it with plot_decision_regions function mlxtend.plotting class.
from mlxtend.plotting import plot_decision_regions

X_combined = np.vstack((X_train, X_test))
y_combined = np.hstack((y_train, y_test))

#
# plot_decision_regions function takes "forest" as classifier
#
fig, ax = plt.subplots(figsize=(7, 7))
plot_decision_regions(X_combined, y_combined, clf=forest)
plt.xlabel('petal length [cm]')
plt.ylabel('petal width [cm]')
plt.legend(loc='upper left')
plt.tight_layout()
plt.show()
Here is how the diagram will look like:
Random Forest Classifier – Sklearn Python Code Example using GridSearch
The following represents training random forest classifier using GridSearch.
from sklearn import datasets
from sklearn.model_selection import train_test_split
from sklearn.metrics import accuracy_score
from sklearn.ensemble import RandomForestClassifier
from sklearn.model_selection import GridSearchCV

#
# Load IRIS data set
#
iris = datasets.load_iris()
X = iris.data[:, 2:]
y = iris.target

#
# Create training/ test data split
#
X_train, X_test, y_train, y_test = train_test_split(X, y, test_size=0.3, random_state=1, stratify=y)

#
# Create an instance of Random Forest Classifier
#
forest = RandomForestClassifier()
#
# Create parameters for GridSearch & train the model
#
parameters = {'max_depth':[2, 3, 4], 'n_estimators':[5, 10, 20]}
rf = GridSearchCV(forest, parameters, cv=5)
rf.fit(X_train, y_train)
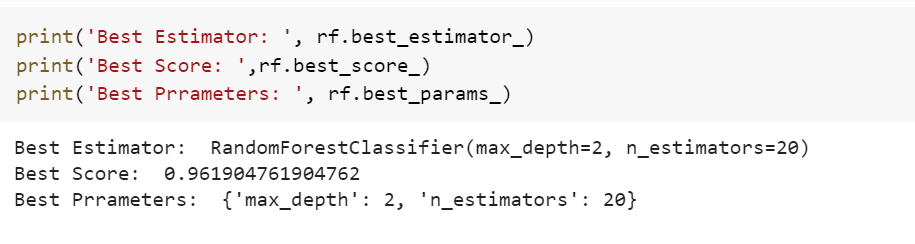
The following code prints information about best estimator, best score, etc.
print('Best Estimator: ', rf.best_estimator_)
print('Best Score: ',rf.best_score_)
print('Best Prrameters: ', rf.best_params_)
The following gets printed.
Conclusion
In this post, you learned some of the following:
- Random forest is an ensemble of the decision trees. It can be used for both classification and regression tasks.
- Random forest helps avoid overfitting which is one of the key problems with decision tree classifiers.
- For creating a random forest, multiple trees are created using different sample sizes and feature sets.

Check out my latest book titled as First Principles Thinking: Building winning products using first principles thinking.
- Mathematics Topics for Machine Learning Beginners - July 6, 2025
- Questions to Ask When Thinking Like a Product Leader - July 3, 2025
- Three Approaches to Creating AI Agents: Code Examples - June 27, 2025
I found it very helpful. However the differences are not too understandable for me