In this post, you will quickly learn about how to install mlxtend python package while you are working with Anaconda Jupyter Notebook.
Mlxtend (machine learning extensions) is a Python library of useful tools for the day-to-day data science tasks. This library is created by Dr. Sebastian Raschka, an Assistant Professor of Statistics at the University of Wisconsin-Madison focusing on deep learning and machine learning research.
Here is the instruction for installing within your Anaconda.
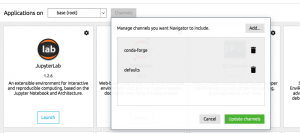
- Add a channel namely conda-forge by clicking on Channels button and then Add button.

Fig 1. Add Channel and Install Mlxtend using Conda Install
- Open a command prompt and execute the following command:
conda install mlxtend –channel Conda-forge - Once installed, launch a Jupyter Notebook and try importing the following. This should work fine.
from mlxtend.plotting import plot_decision_regions

I have been recently working in the area of Data analytics including Data Science and Machine Learning / Deep Learning and BI. I would love to connect with you on Linkedin.
Check out my books titled as Designing Decisions, and First Principles Thinking.
Check out my books titled as Designing Decisions, and First Principles Thinking.
Latest posts by Ajitesh Kumar (see all)
- The Watermelon Effect: When Green Metrics Lie - January 25, 2026
- Coefficient of Variation in Regression Modelling: Example - November 9, 2025
- Chunking Strategies for RAG with Examples - November 2, 2025

This doesn’t works for me. The command “conda install mlxtend –channel Conda-forge” failed. Instead, I used “pip install mlxtend”. Then I could successfully use the command “from mlxtend.plotting import plot_decision_regions” in the Jupiter Notebook.
Thanks for the comments, Jose.
Same here…. “pip install mlxtend” worked for me. Thanks a bunch
That command didnt work for me.
Run “conda install -c conda-forge mlxtend” and will work.