This article represents steps and instructions on how to create a progressive web app (PWA) using Angular 5. In the previous article, we saw the steps to create PWA with Angular 4 and earlier versions, along with installation pre-requisites and introduction to PWA. This article will refer the previous article at various places.
What are Progressive Web Apps (PWA)?
Check out the details in my previous article, How to create progressive web app using Angular 4. The following are key requirements of PWA which shall be addressed in this article:
- Discoverable (Using manifest file)
- App-like offline experience (Using out-of-box Service-worker)
Installation pre-requisites
- Install Lightspeed Chrome plugin for testing the aspects of PWA. Details can be found in my previous article.
- Setup Angular Cli. Details can be found on the page, Angular Getting Started.
Create Angular App with Service Worker
Use commands such as following to create an Angular app with support for service-worker.
ng new iobject-app --service-worker
Test the app using LightSpeed and a report like following would show up. Note the errors related to the manifest file. In the following section, we will learn about how to create the manifest file and related details.
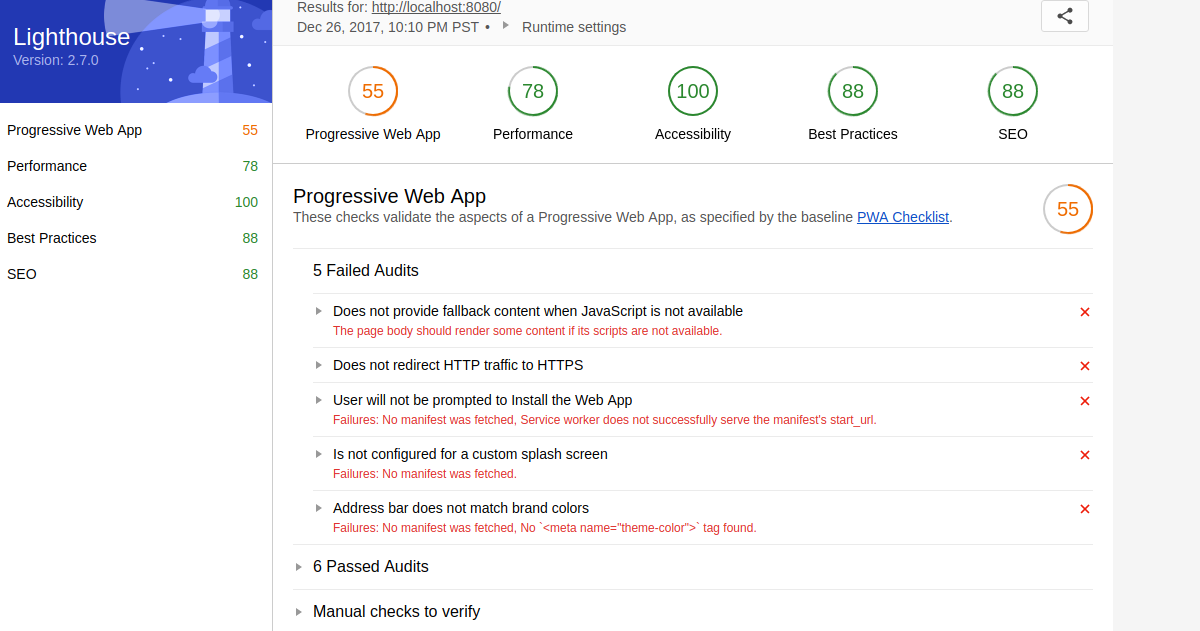
Figure 1. Lightspeed report for Angular 5 App created with Service Worker
Read the details on what are service workers on this Angular.io page, Introduction to Service Workers. From the functional perspective, service workers fulfill the requirement of a decent user experience of the app even when the internet is not available. From the technical perspective, a service worker is a script that runs in the web browser and manages to cache for an application. It functions as the network proxy. All outgoing requests made in the app is first intercepted by the service worker. Service worker can be programmed appropriately to send all outgoing requests to the internet if the internet is available, or else retrieve the data from the local cache.
Executing above command leads to the creation of the file, ngsw-config.json under src folder. Go and look for this file in src folder. The following is the sample code:
{
  "index": "/index.html",
  "assetGroups": [{
    "name": "app",
    "installMode": "prefetch",
    "resources": {
      "files": [
        "/favicon.ico",
        "/index.html"
      ],
      "versionedFiles": [
        "/*.bundle.css",
        "/*.bundle.js",
        "/*.chunk.js"
      ]
    }
  }, {
    "name": "assets",
    "installMode": "lazy",
    "updateMode": "prefetch",
    "resources": {
      "files": [
        "/assets/**"
      ]
    }
  }]
}
Notice some of the following from above config file in relation what gets cached such that the page gets delivered using cache in case of unavailability of the internet:
- index.html
- Bundled css and js files
- favicon.ico
- Any files under folder assets
Create Manifest File for making the app, Mobile-Aware
It would be mandatory to create a manifest file to achieve some of the following objectives:
- Prompt users to install the web app
- Configure the web app for custom splash screen
- Match address bars with brand colors
Create a manifest file, manifest.json and place it within src folder. The following is the content of a sample manifest.json file:
{
  "short_name":"IObjectApp",
  "name":"I Object App",
  "start_url":"/",
  "theme_color":"#f48c5b",
  "background_color":"#ffffff",
  "display":"standalone",
  "orientation":"portrait",
  "icons":[
    {
      "src":"/assets/images/icons/apple-touch-icon.png",
      "type":"image/png"
    },
    {
      "src":"/assets/images/icons/favicon-16x16.png",
      "sizes":"16x16",
      "type":"image/png"
    },
    {
      "src":"/assets/images/icons/favicon-32x32.png",
      "sizes":"32x32",
      "type":"image/png"
    },
    {
      "src":"/assets/images/icons/mstile-150x150.png",
      "sizes":"150x150",
      "type":"image/png"
    },
    {
      "src":"/assets/images/icons/android-chrome-384x384.png",
      "sizes":"384x384",
      "type":"image/png"
    },
    {
      "src": "/assets/images/icons/android-chrome-512x512.png",
      "sizes": "512x512",
      "type": "image/png"
    },
    {
      "src":"/assets/images/icons/android-chrome-192x192.png",
      "sizes":"192x912",
      "type":"image/png"
    }
  ]
}
For creating images of different sizes for the mobile app, you can use the website such as Favicon Generator. Place the image assets appropriately in assets folder as per the path mentioned in manifest.json file.
Open .angular-cli.json in the root folder and add the following entries related to manifest.json and robots.txt. Make sure to add robots.txt file within src folder.
"assets": [
"assets",
"favicon.ico",
"manifest.json",
"robots.txt"
],
Modify Index.html file for including Manifest information
Modify index.html file to accommodate some of the following:
- Mention path to manifest.json file. The following represents the code sample.
<link rel="manifest" href="manifest.json">
- Mention theme-color to match address bars with brand color. The following represents the code sample. Make sure that theme color set is same as that set in manifest.json file.
<meta name="theme-color" content="#f48c5b">
- Mention meta description to describe the app. This is important for SEO.
<meta name="description" content="Share things happening around you which you dislike"/>
- Provide mobile-aware configuration details
<meta name="mobile-web-app-capable" content="yes">
<meta name="apple-mobile-web-app-capable" content="yes">
<meta name="msapplication-starturl" content="/">
- Mention noscript tag for providing fallback content when Javascript is disabled.
<noscript>
  This app works with Javascript being enabled. Enable Javascript in Browser and try again!
</noscript>
The following represents a sample index.html matching above specifications:
<!doctype html>
<html lang="en">
<head>
  <meta charset="utf-8">
  <title>IobjectApp</title>
  <base href="/">

  <meta name="viewport" content="width=device-width, initial-scale=1">
  <link rel="icon" type="image/x-icon" href="favicon.ico">

  <meta name="mobile-web-app-capable" content="yes">
  <meta name="apple-mobile-web-app-capable" content="yes">
  <meta name="msapplication-starturl" content="/">
  <meta name="theme-color" content="#f48c5b">
  <meta name="description" content="Share things happening around you which you dislike"/>

  <link rel="manifest" href="manifest.json">
</head>
<body>
  <app-root></app-root>
  <noscript>
    This app works with Javascript being enabled. Enable Javascript in Browser and try again!
  </noscript>
</body>
</html>
Test Angular 5 App PWA Compliance
For testing the Angular 5 PWA compliance, build the application for production as Angular CLI does not activate the service worker in development mode. If you test in development mode, you will get the message such as “service worker is not activated”. Use the command such as following for building the app for production mode:
ng build --prod
The above command creates the production build files in dist folder. In order to test the files in dist folder, one can install the static web server such as http-server by executing following command:
npm install -g http-server
Go to dist folder and execute the command such as “http-server“. This will start the server and make the app available at http://localhost:8080.
Once done with above, test its compliance from the perspective of PWA by accessing the app in the browser, clicking on Lightspeed chrome plugin and generating the report. The following screenshot represents the sample report. Note that errors related manifest file has gone.
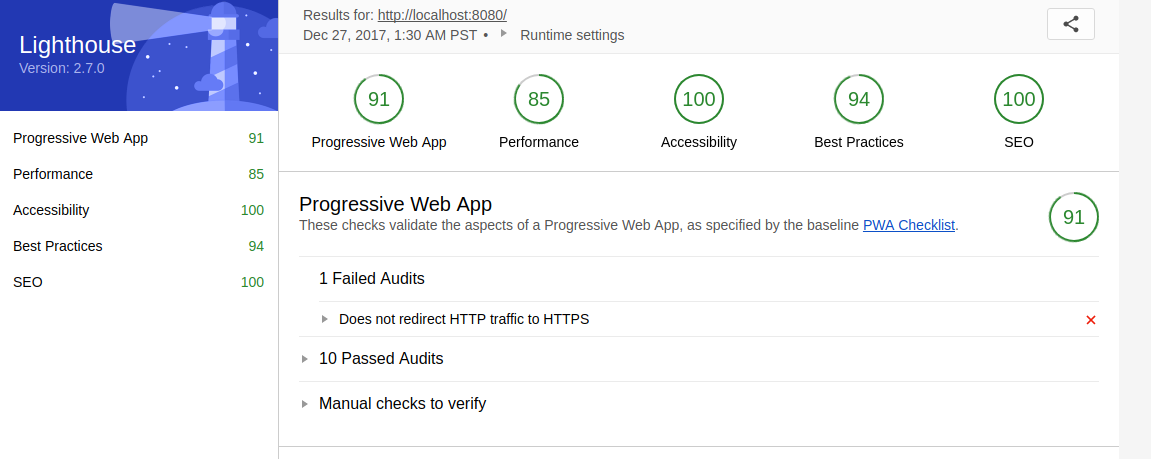
Figure 2. Angular 5 PWA with Updated Manifest
The following steps can be followed to test the functionality of service-worker to serve files even when the internet is not available. In chrome browser, do the following:
- Select Tools > Developer Tools (from the Chrome menu located at the top right corner).
- Go to the Network tab.
- Check the Offline box.
Refresh the page. You would notice that page is served using service-worker. The detailed testing instructions can be found on this page, Service Workers – Getting Started.

Check out my latest book titled as First Principles Thinking: Building winning products using first principles thinking.
- Questions to Ask When Thinking Like a Product Leader - July 3, 2025
- Three Approaches to Creating AI Agents: Code Examples - June 27, 2025
- What is Embodied AI? Explained with Examples - May 11, 2025
I found it very helpful. However the differences are not too understandable for me