In this post, you will learn about how to set up Keras and get started with Keras, one of the most popular deep learning frameworks in current times which is built on top of TensorFlow 2.0 and can scale to large clusters of GPUs. You will also learn about getting started with hello world program with Keras code example. Here are some of the topics which will be covered in this post:
- Set up Keras with Anaconda
- Keras Hello World Program
Set up Keras with Anaconda
In this section, you will learn about how to set up Keras with Anaconda. Here are the steps:
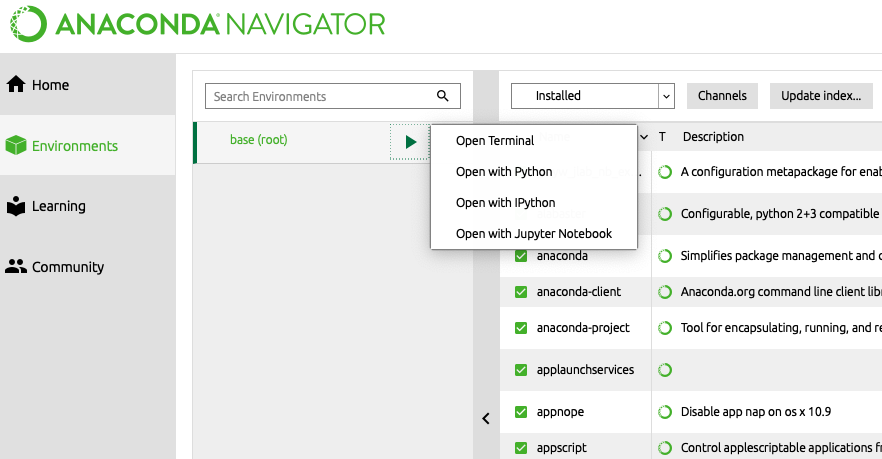
- Go to Environments page in Anaconda App. Click on the arrow mark against base (root) if you want to set up with base root environment. It will open up options. Select the option, open terminal. This will open a terminal. Note that I installed Keras on Mac OS.

- Execute the following command and it would set up the Keras.
#
# Command for setting up Keras
#
conda install -c conda-forge keras
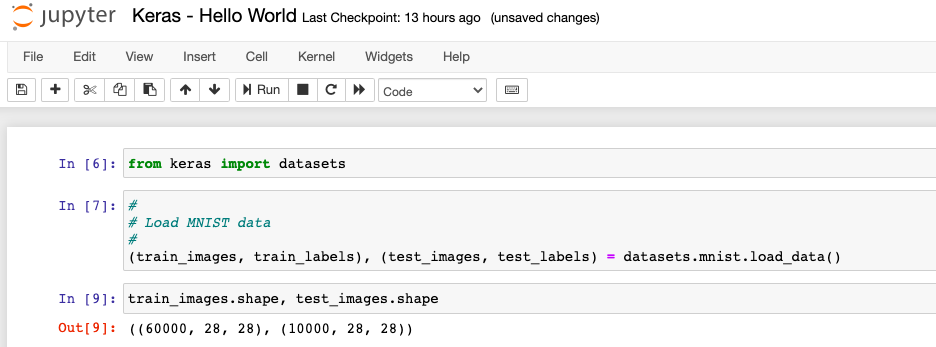
- Once Keras installation is done, open a Jupyter notebook and type the following command. It should load Keras dataset without any error. In the code below, MNIST image dataset available as training and test dataset having 60000 and 10000 images represctively.
from keras import datasets
#
# Load MNIST data
#
(train_images, train_labels), (test_images, test_labels) = datasets.mnist.load_data()
#
# Check the dataset loaded
#
train_images.shape, test_images.shape

Keras can be imported from tensorflow using the following code:
from tensorflow import keras
Keras Hello World Program
In this section, you will learn about training a very simplistic deep neural network (Hello World program) model for classifying the grayscale images of handwritten digits (28 × 28 pixels) into their 10 categories (0 through 9). In order to build the model, the MNIST dataset is used. MNIST dataset is a set of 60,000 training images and 10,000 test images, assembled by the National Institute of Standards and Technology (the NIST). The following are some of the key steps needed to be followed for training the deep neural network:
- Setting up neural network architecture
- Neural network preparation
- Data preparation
- Train / test the network
Here is the pipeline for training and testing the neural network model:
- Deep Neural Network Architecture Setup: First and foremost, the neural network architecture comprising of one or more layers needs to be set up. In other words, In simple words, a directed acyclic graph of layers (also called as neural network) need to be architected and setup. These layers act as filters for the data. Data is fed into the layers and these layers extract representations out of the data and send output of more useful form. As a matter of fact, the deep learning network is nothing but a a sieve for data processing, made of a succession of increasingly refined data filters also called as the layers. Our hello world program comprises of two dense layers. Dense layer represents the fact that layers are fully connected.
- First layer consisting of 512 units and activation function as relu
- Second and final layer consisting of 10 units and activation function as softmax whose out is probability scores where each score represents the probability that the input image looks like 0 – 9 digit.
Here is how the code relating to setting up neural network architecture will look like.
from keras import models
from keras import layers
#
# Create network comprising of two layers
#
network = models.Sequential()
network.add(layers.Dense(512, activation='relu', input_shape=(28 * 28,), name="layer1"))
network.add(layers.Dense(10, activation='softmax', name="layer2"))
- Neural Network Preparation: Next step is to prepare the network which comprises of the following:
- Identify a loss function to be used based on which the network will be able to measure its performance on the training data,
- Identify an optimizer function based on which network will update itself based on learning from data and the loss function
- Identify a metrics based on which network performance will be emasured.
In the hello world program, here is the network preparation code:
#
# Prepare the neural network
#
network.compile(optimizer='rmsprop',
                loss='categorical_crossentropy',
                metrics=['accuracy'])
- Data Preparation: Next step is to prepare the data for feeding into the neural network. Neural networks don’t process raw data, like text files, encoded JPEG image files, or CSV files. Images need to be read and decoded into integer tensors, then converted to floating point and normalized to small values (usually between 0 and 1). As part of data preparation, the following is done:
- Prepare the training images and labels
- Prepare the test images and labels
from keras.utils import to_categorical
#
# Prepare the training images and training labels
#
train_images = train_images.reshape((60000, 28 * 28))
train_images = train_images.astype('float32') / 255
train_labels = to_categorical(train_labels)
#
# Prepare the test images and test labels
#
test_images = test_images.reshape((10000, 28 * 28))
test_images = test_images.astype('float32') / 255
test_labels = to_categorical(test_labels)
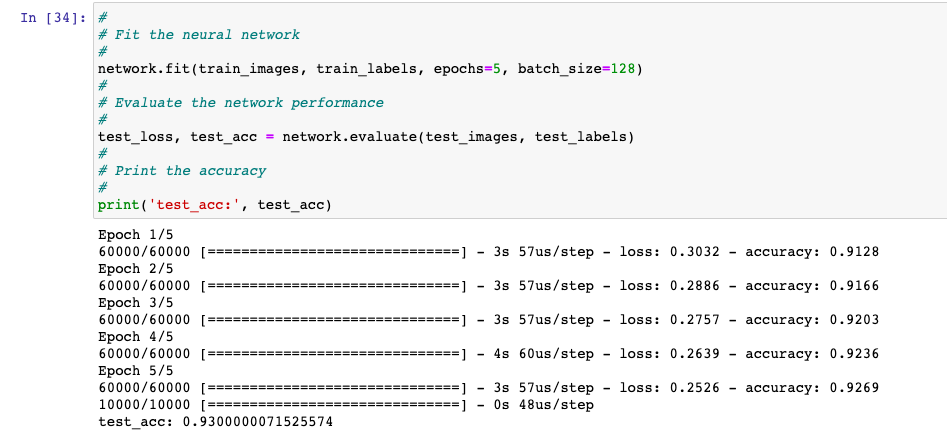
- Train / Test / Evaluate Neural Network: Finally, train and test the neural network. Fit method is invoked on the network. Training data (images) and related labels is passed to the network.
#
# Fit the neural network
#
network.fit(train_images, train_labels, epochs=5, batch_size=128)
#
# Evaluate the network performance
#
test_loss, test_acc = network.evaluate(test_images, test_labels)
#
# Print the accuracy
#
print('test_acc:', test_acc)

Hello World Keras Program / Code
Here is the entire code for training deep neural network for classifying the grayscale images of handwritten digits (28 × 28 pixels) into their 10 categories (0 through 9).
from keras import datasets
from keras import models
from keras import layers
from keras.utils import to_categorical
#
# Load MNIST data
#
(train_images, train_labels), (test_images, test_labels) = datasets.mnist.load_data()
#
# Create network comprising of two dense (fully connected) layers
#
network = models.Sequential()
network.add(layers.Dense(512, activation='relu', input_shape=(28 * 28,), name="layer1"))
network.add(layers.Dense(10, activation='softmax', name="layer2"))
#
# Prepare the training images and training labels
#
train_images = train_images.reshape((60000, 28 * 28))
train_images = train_images.astype('float32') / 255
train_labels = to_categorical(train_labels)
#
# Prepare the test images and test labels
#
test_images = test_images.reshape((10000, 28 * 28))
test_images = test_images.astype('float32') / 255
test_labels = to_categorical(test_labels)
#
# Prepare the network
#
network.compile(optimizer='rmsprop',
                loss='categorical_crossentropy',
                metrics=['accuracy'])
#
# Fit the neural network
#
network.fit(train_images, train_labels, epochs=5, batch_size=128)
#
# Evaluate the network performance
#
test_loss, test_acc = network.evaluate(test_images, test_labels)
#
# Print the accuracy
#
print('test_acc:', test_acc)
Conclusions
Here is what you learned in this post related to setting up Keras and getting started with Hello World program:
- Training the deep neural network using Keras will require the following to be done:
- Set up the neural network architecture comprising of two or more layers with each layer built using multiple units and activation function
- Prepare the network by assigning the loss function, optimization function and a scoring metrics
- Prepare the data before feeding into the network
- Fit the network model using training data (images) and labels
- Evaluate the neural network model by passing the test images and test labels.
- The Watermelon Effect: When Green Metrics Lie - January 25, 2026
- Coefficient of Variation in Regression Modelling: Example - November 9, 2025
- Chunking Strategies for RAG with Examples - November 2, 2025

I found it very helpful. However the differences are not too understandable for me