This article represents steps required to get started with / create progressive web app (PWA) using Angular 4.* and earlier versions such as Angular 2.*. You will note that we used the sw-precache NPM module for working with a service worker for seamless offline experience when the internet is not available. This is one of the key requirements of a progressive web app.
Angular 5.* introduced the service-worker concept for providing out-of-the-box support for the App-like offline experience. We shall deal with using Angular 5 service worker for creating a progressive web app in a follow-up article.
What are Progressive Web Apps (PWA)?
A progressive web app has some of the following characteristics:
- Works across different browsers
- Responsive
- App-like
- Offline support
- Safe (must be accessible on Https)
- Discoverable (through manifest file)
- Installable from app stores
The following enlists the most basic requirements for PWA. The details can be found on this page, PWA Checklist.
- App design is mobile-friendly
- App serves over Https
- App offline experience in terms of APP URLs loading and presenting some content/interactiveness even when offline
- App performance/loading experience in terms of app loading fast (less than 10 seconds) even on first time loading.
- Cross-browser support across Chrome, Firefox, Safari, Edge browsers
- Faster page transitions
- Each page having an associated URL
Installation Pre-requisites for Progressive Web Angular App
To get started with an Angular App as PWA, you may want to do some of the following software libraries/tools setup:
- Setup Angular Cli
- Create an Angular Web App project using Cli. You can find the instructions on Angular getting started page.
- Install Lighthouse tool, a chrome plugin, which can be used to some of the following aspects related to a web app:
- Progressive web app (PWA)
- Performance
- Accessibility
- Best practices
- SEO
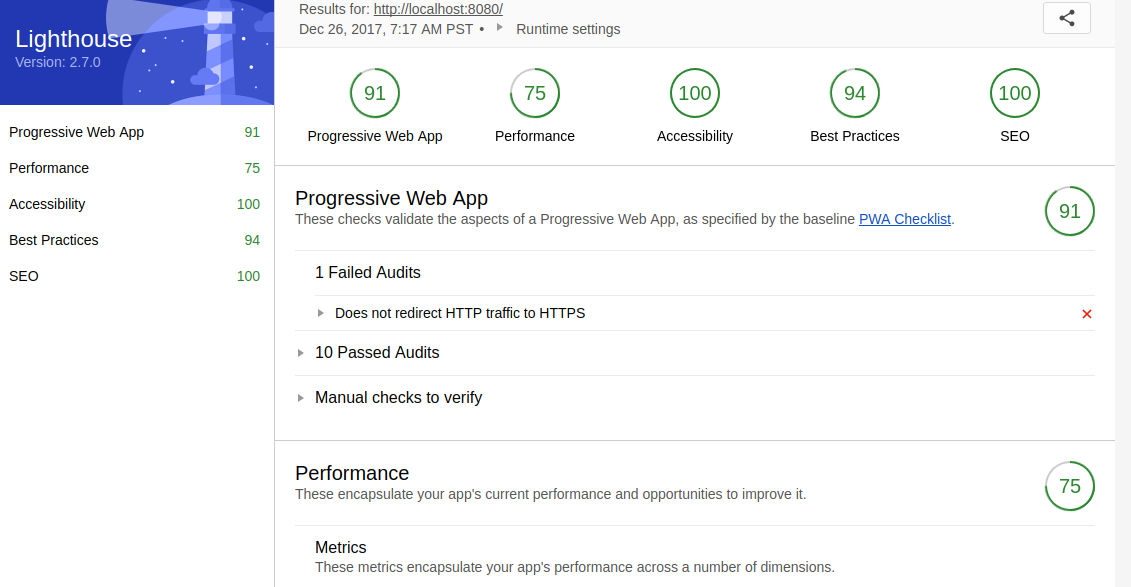
Following is a sample screenshot of a report generated by Lighthouse plugin:

Figure 1. Sample Lighthouse Report
Setup Angular CLI and Create an Angular App
Access Angular.io Getting Started page to achieve some of the following:
- Setup Angular development environment including Angular CLI
- Create a template Angular app using the command such as following:
ng new iobject-app
- Run the project by launching the server.
cd iobject-app
ng serve --open
This would open the app in the browser at URL, http://localhost:4200, watches updates to any files and rebuilds the app in case of any changes.
Configure Angular App as PWA
Once you have created an Angular app using CLI, next step is to configure the app appropriately to meet the PWA requirements. The following needs to be done in order to configure your Angular app as a progressive web app (PWA).
- Mobile-friendly app
- Create assets (images) for different devices
- Create a manifest file, manifest.json
- Configure .angular.cli.json; Add mainfest.json as an asset
- App offline experience
- Setup SW Precache plugin
- Configure SW Precache for creating a service worker
- Configure Package.json
- Modify index.html for mobile-friendly support
- Package.json alias for creating PWA production assets
Create Assets for Different Devices
- Use website such as Favicon Generator to create images of different sizes for different devices.
- Place the assets files under folder structure such as src/assets/images/icons. Place favicon.ico inside src/ folder.
Create Manifest File
Create a manifest file, manifest.json, in src folder. Provide details of images created using above mentioned tool (Favicon generator).
Note that manifest file makes the app discoverable.
{
  "short_name":"IObjectApp",
  "name":"I Object App",
  "start_url":"/",
  "theme_color":"#f48c5b",
  "background_color":"#ffffff",
  "display":"standalone",
  "orientation":"portrait",
  "icons":[
    {
      "src":"/assets/images/icons/apple-touch-icon.png",
      "type":"image/png"
    },
    {
      "src":"/assets/images/icons/favicon-16x16.png",
      "sizes":"16x16",
      "type":"image/png"
    },
    {
      "src":"/assets/images/icons/favicon-32x32.png",
      "sizes":"32x32",
      "type":"image/png"
    },
    {
      "src":"/assets/images/icons/mstile-150x150.png",
      "sizes":"150x150",
      "type":"image/png"
    },
    {
      "src":"/assets/images/icons/android-chrome-384x384.png",
      "sizes":"384x384",
      "type":"image/png"
    },
    {
      "src": "/assets/images/icons/android-chrome-512x512.png",
      "sizes": "512x512",
      "type": "image/png"
    },
    {
      "src":"/assets/images/icons/android-chrome-192x192.png",
      "sizes":"192x912",
      "type":"image/png"
    }
  ]
}
Configure .angular.cli.json – Add Mainfest.json as an Asset
Configure .angular.cli.json within project root folder to add manifest.json as an additional asset:
"assets": [
    "assets",
    "favicon.ico",
    "manifest.json"
  ]
Setup SW Precache Plugin
SW Precache plugin is a webpack plugin for using service workers to cache your external project dependencies. This plugin will be used to satisfy the PWA requirement such as related with app providing decent offline experience in terms of APP URLs loading and presenting some content/interactiveness in case of absence of internet.
Install SW Precache Webpack plugin within the project root folder using the command such as following:
npm install --save-dev sw-precache-webpack-plugin
Configure SW Precache for Creating a Service Worker
Create a file, precache-config.js in project root folder. The following configuration will be used while creating the service-worker.js file.
var SWPrecacheWebpackPlugin = require('sw-precache-webpack-plugin');

module.exports = {
  navigateFallback: '/index.html',
  navigateFallbackWhitelist: [/^(?!\/__)/],
  stripPrefix: 'dist',
  root: 'dist/',

  plugins: [
    new SWPrecacheWebpackPlugin(
      {
        cacheId: 'iobjectapp',
        filename: 'service-worker.js',
        staticFileGlobs: [
          'dist/index.html',
          'dist/**.js',
          'dist/**.css',
        ],
        minify: true,
        stripPrefix: 'dist/assets/',
        mergeStaticsConfig: true
      }
    ),
  ],
}
Modify Index.html for Mobile-friendly support
<html lang="en">
<head>
<meta charset="utf-8">
<title>IobjectApp</title>
<base href="/">
<link rel="icon" type="image/x-icon" href="favicon.ico">
<link rel="stylesheet" href="https://maxcdn.bootstrapcdn.com/bootstrap/4.0.0-beta.2/css/bootstrap.min.css" integrity="sha384-PsH8R72JQ3SOdhVi3uxftmaW6Vc51MKb0q5P2rRUpPvrszuE4W1povHYgTpBfshb" crossorigin="anonymous">
<meta name="viewport" content="width=device-width, initial-scale=1">
<meta name="mobile-web-app-capable" content="yes">
<meta name="apple-mobile-web-app-capable" content="yes">
<meta name="msapplication-starturl" content="/">
<meta name="theme-color" content="#f48c5b">
<meta name="description" content="Share things happening around you which you dislike"/>
<link rel="manifest" href="manifest.json">
</head>
<body>
<app-root></app-root>
<img src="data:image/gif;base64,R0lGODlhAQABAIAAAAAAAP///yH5BAEAAAAALAAAAAABAAEAAAIBRAA7" data-wp-preserve="%3Cscript%3E%0Aif%20('serviceWorker'%20in%20navigator)%20%7B%0Anavigator.serviceWorker.register('%2Fservice-worker.js')%0A.then(function(registration)%7B%0Aconsole.log('Service%20worker%20registered%3A'%2C%20registration)%3B%0A%7D)%0A.catch(function(error)%7B%0Aconsole.log('Service%20worker%20registration%20failed%3A'%2C%20error)%3B%0A%7D)%3B%0A%7D%20else%20%7B%0Aconsole.log('Service%20workers%20are%20not%20supported.')%3B%0A%7D%0A%3C%2Fscript%3E" data-mce-resize="false" data-mce-placeholder="1" class="mce-object" width="20" height="20" alt="<script>" title="<script>" />
<!-- Bootstrap Javascript -->
<script src="https://code.jquery.com/jquery-3.2.1.slim.min.js" integrity="sha384-KJ3o2DKtIkvYIK3UENzmM7KCkRr/rE9/Qpg6aAZGJwFDMVNA/GpGFF93hXpG5KkN" crossorigin="anonymous"></script>
<script src="https://cdnjs.cloudflare.com/ajax/libs/popper.js/1.12.3/umd/popper.min.js" integrity="sha384-vFJXuSJphROIrBnz7yo7oB41mKfc8JzQZiCq4NCceLEaO4IHwicKwpJf9c9IpFgh" crossorigin="anonymous"></script>
<script src="https://maxcdn.bootstrapcdn.com/bootstrap/4.0.0-beta.2/js/bootstrap.min.js" integrity="sha384-alpBpkh1PFOepccYVYDB4do5UnbKysX5WZXm3XxPqe5iKTfUKjNkCk9SaVuEZflJ" crossorigin="anonymous"></script>
<noscript>
This app works with Javascript being enabled. Enable Javascript in Browser and try again!
</noscript>
</body>
</html>
Note some of the following code snippets:
- Meta tags for mobile-aware app within head tag
</pre>

<meta name="viewport" content="width=device-width, initial-scale=1">
<meta name="mobile-web-app-capable" content="yes">
<meta name="apple-mobile-web-app-capable" content="yes">
<meta name="msapplication-starturl" content="/">
<meta name="theme-color" content="#f48c5b">
<meta name="description" content="Share things happening around you which you dislike"/>
<link rel="manifest" href="manifest.json">
<pre>
- Register service worker to get data from cache if internet is not available
<script>
 if ('serviceWorker' in navigator) {
 navigator.serviceWorker.register('/service-worker.js')
 .then(function(registration){
 console.log('Service worker registered:', registration);
 })
 .catch(function(error){
 console.log('Service worker registration failed:', error);
 });
 } else {
 console.log('Service workers are not supported.');
 }
</script>
Configure Package.json for Creating PWA Prod Assets
Add an alias such as following in package.json to generate production assets for PWA.
"pwa": "ng build --prod && sw-precache --root=dist --config=precache-config.js"
Execute command such as following to generate the production asset:
npm run pwa
Test Angular App PWA Compliance with Lightspeed
Deploy your angular app and test how compliant is it from the perspective of PWA by accessing the angular app in the browser. Click on Lightspeed chrome plugin and generate the report.
- The Watermelon Effect: When Green Metrics Lie - January 25, 2026
- Coefficient of Variation in Regression Modelling: Example - November 9, 2025
- Chunking Strategies for RAG with Examples - November 2, 2025

I found it very helpful. However the differences are not too understandable for me