Google Cloud Text-to-Speech is a text-to-speech conversion service which got launched a few days back by Google Cloud. This was one of the most important service missing from Google Cloud AI portfolio which is now available and completes the loop for text-to-speech and speech-to-text services by Google Cloud. In next few weeks, you will learn about different usages of Google Cloud text-to-speech service with other Google cloud services.
In this post, you will learn about some of the following:
- Setup Eclipse IDE-based Development Environment
- Create a Maven or Spring Boot (Spring Starter) Project
Setup Eclipse IDE-based Development Environment
The following are some of the key aspects of setting up the development environment using Eclipse IDE:
- Select or create a Google cloud project
- Enable billing for the project
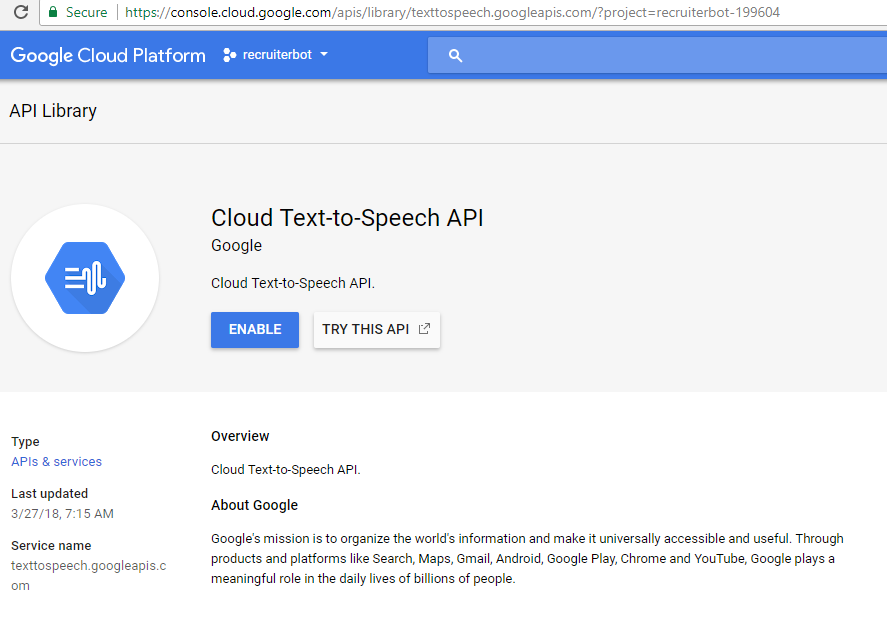
- Enable Google Cloud Text-to-Speech Service; Follow this page, Cloud Text-to-Speech API to enable the service. Do not forget to select the project you created in above steps.

Figure 1. Enable Google Cloud Text-to-Speech Service
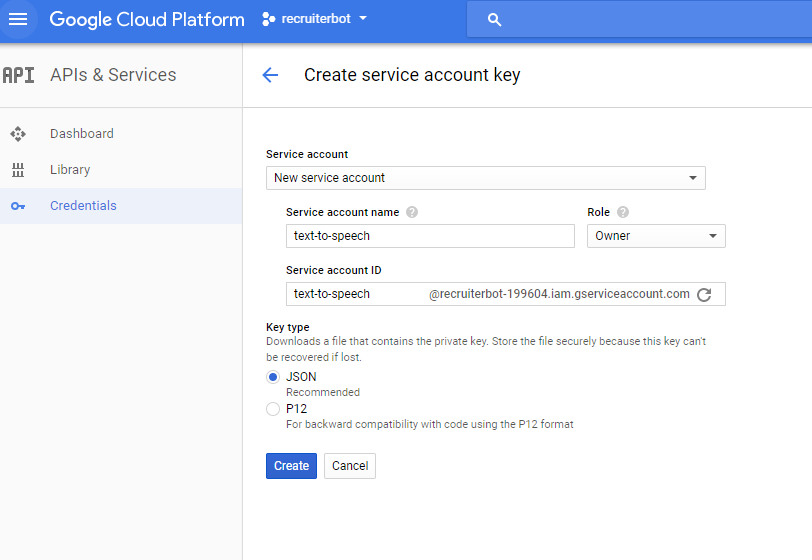
- Set up the authentication by creating credential in form of a service account key. The following represents the same:

Figure 2. Google Cloud Service – Create Service Account Key
- Download the service account key; It gets downloaded as a JSON file.
- Create a Spring Boot (Spring Starter) project or a Maven project from Eclipse IDE.
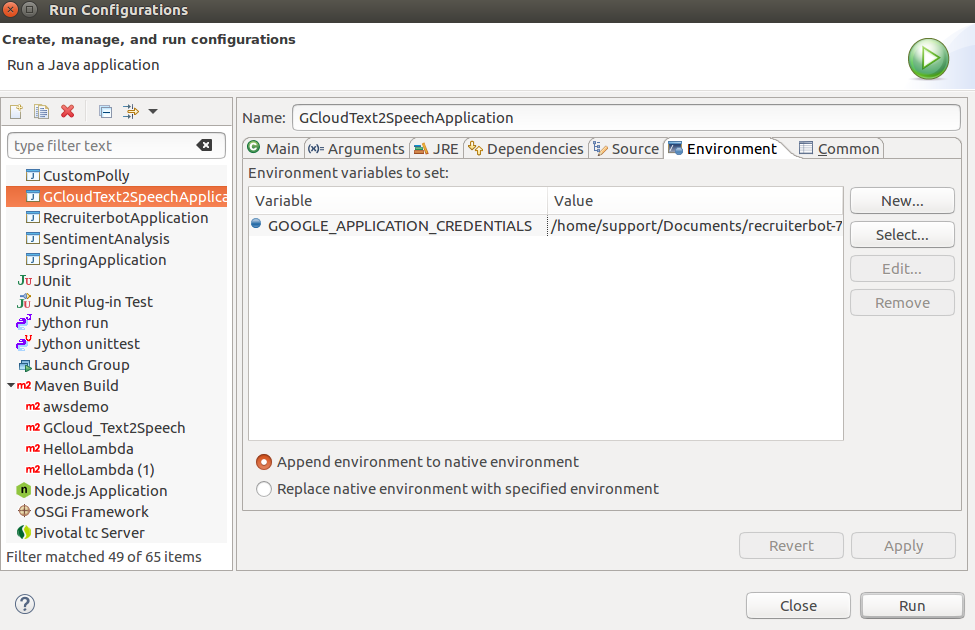
- Right-click on the project. Click on Run As > Configurations and set the environment variable as shown in the next step.
- Set the GOOGLE_APPLICATION_CREDENTIALS as an environment variable in Eclipse IDE. The following screenshot represents the same.

Figure 3. Google Cloud Text to Speech – Setting Environment Variable
Create a Maven or Spring Boot (Spring Starter) Project
The following are two key steps which needed to be taken to create a sample program/app for demonstrating google cloud text-to-speech services
- Include Maven POM.xml Artifacts for Text-to-Speech APIs
- Create the demo app related to text-to-speech
Include Maven POM.xml Artifacts for Text-to-Speech APIs
The following are some of the artifacts which need to be included for working with Google Cloud Text-to-speech APIs
- com.google.guava
- org.threeten (threetenbp)
- com.google.http-client (google-http-client)
- com.google.cloud (google-cloud-texttospeech)
<!-- https://mvnrepository.com/artifact/com.google.guava/guava -->
<dependency>
    <groupId>com.google.guava</groupId>
    <artifactId>guava</artifactId>
    <version>24.1-jre</version>
</dependency>
<!-- https://mvnrepository.com/artifact/org.threeten/threetenbp -->
<dependency>
    <groupId>org.threeten</groupId>
    <artifactId>threetenbp</artifactId>
    <version>1.3.6</version>
</dependency>
<!-- https://mvnrepository.com/artifact/com.google.http-client/google-http-client -->
<dependency>
    <groupId>com.google.http-client</groupId>
    <artifactId>google-http-client</artifactId>
    <version>1.22.0</version>
</dependency>
<!-- https://mvnrepository.com/artifact/com.google.cloud/google-cloud-texttospeech -->
<dependency>
    <groupId>com.google.cloud</groupId>
    <artifactId>google-cloud-texttospeech</artifactId>
    <version>0.42.0-beta</version>
</dependency>
Create the Demo App related to Text-to-Speech Conversion
Pay attention to some of the following aspects which needed to be done for achieving text-to-speech conversion:
- Create an instance of TextToSpeechClient
- Set the text input to be synthesized
- Build the voice request. Set the voice type (male or female) and language code appropriately.
- Select the type of audio file you want as an output based on audio encoding value. In the example below, MP3 is the type of audio encoding used. The following are some of the different audio encoding supported, the details of which could be found on the page, Introduction to Audio Encoding
- FLAC
- Linear 16
- MULAW
- AMR_WB
- OGG_OPUS
- Process the text to speech conversion
- Retrieve the audio output/content
- Write the audio content to a file
The following is the code representing above steps:
@SpringBootApplication
public class GCloudText2SpeechApplication implements CommandLineRunner {

    public static void main(String[] args) {
        SpringApplication app = new SpringApplication(GCloudText2SpeechApplication.class);
        app.run(args);
    }

    @Override
    public void run(String... arg0) throws Exception {

        String text = "Hello World! How are you doing today? This is Google Cloud Text-to-Speech Demo!";
        String outputAudioFilePath = "/home/support/Documents/output.mp3";

        try (TextToSpeechClient textToSpeechClient = TextToSpeechClient.create()) {
            // Set the text input to be synthesized
            SynthesisInput input = SynthesisInput.newBuilder().setText(text).build();

            // Build the voice request; languageCode = "en_us"
            VoiceSelectionParams voice = VoiceSelectionParams.newBuilder().setLanguageCode("en-US")
                    .setSsmlGender(SsmlVoiceGender.FEMALE)
                    .build();

            // Select the type of audio file you want returned
            AudioConfig audioConfig = AudioConfig.newBuilder().setAudioEncoding(AudioEncoding.MP3) // MP3 audio.
                    .build();

            // Perform the text-to-speech request
            SynthesizeSpeechResponse response = textToSpeechClient.synthesizeSpeech(input, voice, audioConfig);

            // Get the audio contents from the response
            ByteString audioContents = response.getAudioContent();

            // Write the response to the output file.
            try (OutputStream out = new FileOutputStream(outputAudioFilePath)) {
                out.write(audioContents.toByteArray());
                System.out.println("Audio content written to file \"output.mp3\"");
            }
        }
    }
}
Further Reading / References
- Google Cloud Text-to-Speech Service
- Cloud Text-to-Speech API
- Cloud Text-to-Speech API Playground
- Introduction to Audio Encoding
Summary
In this post, you learned about how to get started with Google Cloud Text-to-Speech Service using Java/Sring Boot app.
Did you find this article useful? Do you have any questions or suggestions about this article? Leave a comment and ask your questions and I shall do my best to address your queries.
- The Watermelon Effect: When Green Metrics Lie - January 25, 2026
- Coefficient of Variation in Regression Modelling: Example - November 9, 2025
- Chunking Strategies for RAG with Examples - November 2, 2025

I found it very helpful. However the differences are not too understandable for me