
In this post, you will learn about how to use Flexible Widget to ensure equal spacing for children of Row.
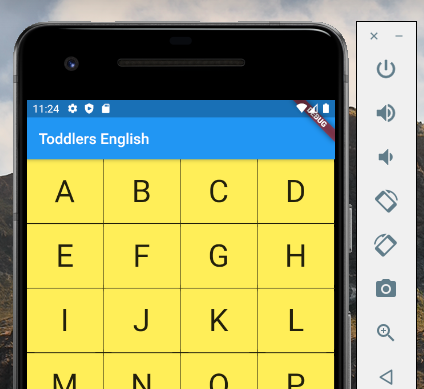
Flexible is a widget that controls how a child of a Row, Column, or Flex flexes. In this post, we will see how to use a Flexible widget to control the width of the children’s widget contained in the Row widget. Look at each of the rows in the app below consisting of 4 letters of the English Alphabet.
In case we don’t use a Flexible widget, we may have to assign the width of each of the containers (represented using commented cell width in the code below. However, using a Flexible widget, there is no need for the cell width of each Container represented using a Container widget. As the width of each of the container widgets is the same, one may not be required to use flex property. Alternatively, one could use flex:1 as well. You could get to see the full code in the earlier post, Flutter Row Concepts with Code Example.
Row(
          children: List.generate(alphabets[6].length, (index) {
            return Flexible(
              child: Container(
                  height: cellheight,
                 //width: cellwidth
                  alignment: cellalignment,
                  decoration: const BoxDecoration(
                      color:  Color(0xFFFFEE58),
                      border: Border(
                        right: BorderSide(width: 1.0, color: Color(0xFFFF000000)),
                        bottom: BorderSide(width: 1.0, color: Color(0xFFFF000000)),
                      )),
                  child: Text(
                    alphabets[6][index],
                    textScaleFactor: tsFactor,
                  )),
            );
          }),
        ),
More Flexible Widget Example with Row Widget
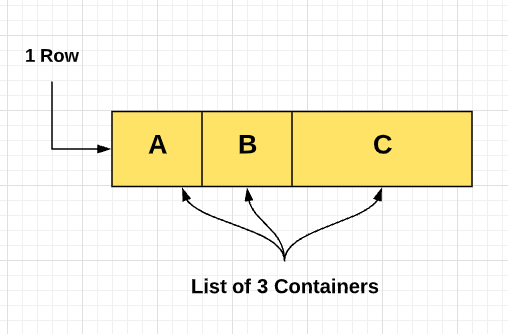
For the row that looks like the following, the code will look such as the following. Make a note of how flex: 2 for third container widget consisting of C as Text Widget. The first two Flexible widgets has the value of flex property as 1.
Row(children: [
      Flexible(
        flex: 1,
        child: Container(
            height: 100,
            alignment: Alignment.center,
            decoration: const BoxDecoration(
                color: Color(0xFFFFEE58),
                border: Border(
                  right: BorderSide(
                      width: 1.0, color: Color(0xFFFF000000)),
                  bottom: BorderSide(
                      width: 1.0, color: Color(0xFFFF000000)),
                )),
            child: Text('A', textScaleFactor: 3.0)),
      ),
      Flexible(
        flex: 1,
        child: Container(
            height: 100,
            alignment: Alignment.center,
            decoration: const BoxDecoration(
                color: Color(0xFFFFEE58),
                border: Border(
                  right: BorderSide(
                      width: 1.0, color: Color(0xFFFF000000)),
                  bottom: BorderSide(
                      width: 1.0, color: Color(0xFFFF000000)),
                )),
            child: Text('B', textScaleFactor: 3.0)),
      ),
      Flexible(
        flex: 2,
        child: Container(
            height: 100,
            alignment: Alignment.center,
            decoration: const BoxDecoration(
                color: Color(0xFFFFEE58),
                border: Border(
                  right: BorderSide(
                      width: 1.0, color: Color(0xFFFF000000)),
                  bottom: BorderSide(
                      width: 1.0, color: Color(0xFFFF000000)),
                )),
            child: Text('C', textScaleFactor: 3.0)),
      ),
    ]);
The entire code of the app would look like the following:
void main() {
  runApp(MyApp());
}

class MyApp extends StatelessWidget {
  @override
  Widget build(BuildContext context) {
    return MaterialApp(
        title: 'Learn English',
        home: Scaffold(
          appBar: AppBar(
            title: Text('Toddler\s English'),
          ),
          body: Center(
            child: AlphabetWidget(),
          ),
        ));
  }
}

class AlphabetWidget extends StatelessWidget {
  @override
  Widget build(BuildContext context) {
    return Row(children: [
      Flexible(
        flex: 1,
        child: Container(
            height: 100,
            alignment: Alignment.center,
            decoration: const BoxDecoration(
                color: Color(0xFFFFEE58),
                border: Border(
                  right: BorderSide(
                      width: 1.0, color: Color(0xFFFF000000)),
                  bottom: BorderSide(
                      width: 1.0, color: Color(0xFFFF000000)),
                )),
            child: Text('A', textScaleFactor: 3.0)),
      ),
      Flexible(
        flex: 1,
        child: Container(
            height: 100,
            alignment: Alignment.center,
            decoration: const BoxDecoration(
                color: Color(0xFFFFEE58),
                border: Border(
                  right: BorderSide(
                      width: 1.0, color: Color(0xFFFF000000)),
                  bottom: BorderSide(
                      width: 1.0, color: Color(0xFFFF000000)),
                )),
            child: Text('B', textScaleFactor: 3.0)),
      ),
      Flexible(
        flex: 2,
        child: Container(
            height: 100,
            alignment: Alignment.center,
            decoration: const BoxDecoration(
                color: Color(0xFFFFEE58),
                border: Border(
                  right: BorderSide(
                      width: 1.0, color: Color(0xFFFF000000)),
                  bottom: BorderSide(
                      width: 1.0, color: Color(0xFFFF000000)),
                )),
            child: Text('C', textScaleFactor: 3.0)),
      ),
    ]);
  }
}
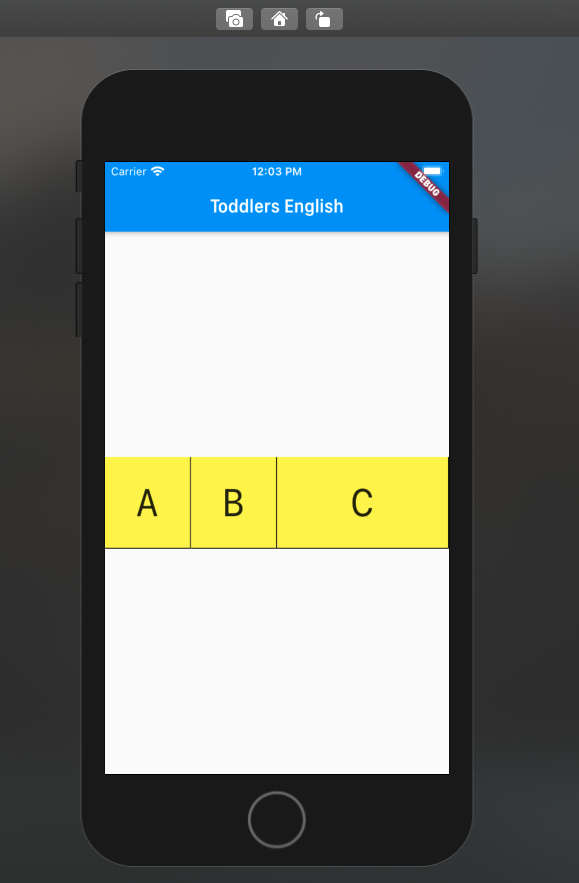
When deployed on iOS phone simulator, the above code would get displayed as the following:

Check out my books titled as Designing Decisions, and First Principles Thinking.
- The Watermelon Effect: When Green Metrics Lie - January 25, 2026
- Coefficient of Variation in Regression Modelling: Example - November 9, 2025
- Chunking Strategies for RAG with Examples - November 2, 2025

I found it very helpful. However the differences are not too understandable for me