Azure Machine Learning Studio is a powerful cloud-based platform that brings the world of machine learning to your fingertips. Whether you’re a data scientist, a developer, or a business professional, Azure Machine Learning Studio provides a user-friendly and collaborative environment to build, train, and deploy machine learning models with ease. This blog post serves as a quick tutorial to help you get started with Azure Machine Learning Studio. From setting up your workspace to exploring key features and best practices, we will walk you through the essential steps to embark on your machine learning journey.
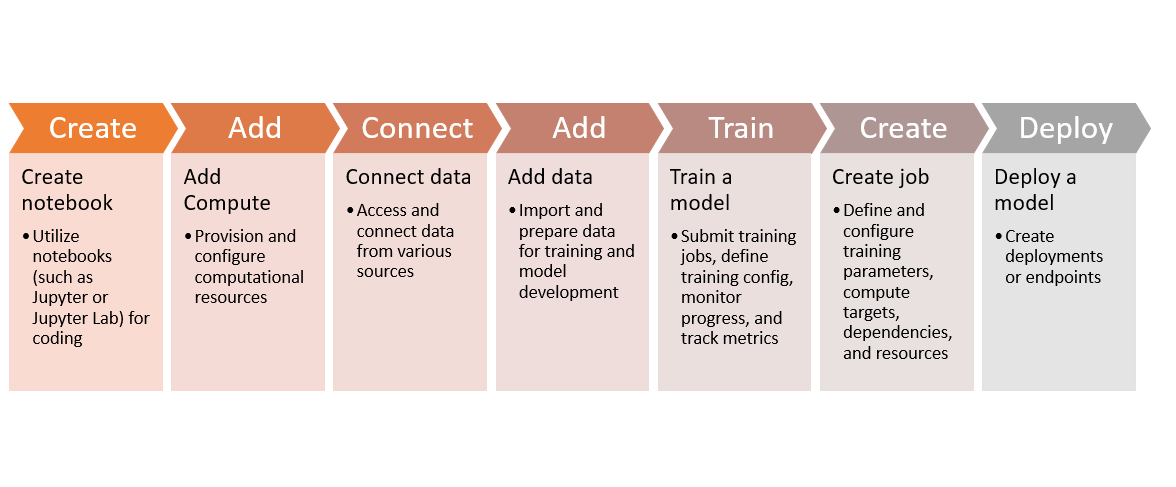
Azure ML Studio – Machine Learning Pipeline
Before we can proceed with the tasks in Azure Machine Learning Studio, we need to create a new workspace and navigate to it. The workspace serves as the centralized hub for managing your machine learning projects, experiments, models, and resources in Azure. Once the workspace is created, we can access it and perform the following tasks:

- Create notebook: Azure Machine Learning Studio allows you to create and use notebooks for interactive cloud development. Notebooks provide a collaborative environment where you can write and execute code, visualize data, and document your experiments and findings. You can use popular notebook frameworks like Jupyter or JupyterLab to write code in various programming languages, including Python and R. Notebooks are useful for exploratory data analysis, prototyping models, and sharing insights with your team.
- Add compute: In Azure Machine Learning Studio, you can add compute resources to your workspace. This involves provisioning and configuring the necessary computational resources, such as virtual machines, GPU clusters, or Azure Databricks, to execute your training scripts, notebooks, or service deployments. You can choose the appropriate compute target based on your requirements, such as CPU or GPU capabilities, memory capacity, or scale-out options.
- Connect data: Azure Machine Learning Studio allows you to connect and access data from various sources. You can connect to datastores, which are cloud-based storage locations where you can securely store and manage your data. Additionally, you can connect to local files, public URLs, or leverage the vast collection of datasets available through Open Datasets, which provides a wide range of curated datasets for machine learning tasks.
- Add data: Once you have established the data connection, you can import and prepare your data for training and model development. This involves loading datasets into your workspace from the connected sources, performing data transformation and cleaning operations, handling missing values, normalizing or scaling features, and splitting the data into training and validation sets. Azure Machine Learning Studio provides tools and libraries to help you perform these data preparation tasks efficiently.
- Train a model: After preparing your data, you can submit a training job to train your machine learning model. Azure Machine Learning Studio allows you to use your own custom code or pre-built algorithms for training. You can define the training configuration, such as the training script, framework, environment dependencies, and hyperparameters. During the training process, you can monitor the progress of your training runs, track metrics, and visualize performance to gain insights into the model’s behavior and make adjustments if needed.
- Create job: Creating a job in Azure Machine Learning Studio involves defining and configuring the parameters for training your model. You can specify the script or notebook to be executed, the compute target where the job will run, the necessary dependencies and packages required for the job, and any additional settings or resources. Once the job is submitted, you can monitor its progress, view logs, and access intermediate or final outputs generated during the training process.
- Deploy a model: Once you have a trained model, you can create a deployment or endpoint to make the model available for scoring or consumption. Azure Machine Learning Studio provides the capability to deploy your model as a web service or an API endpoint. This allows other applications and services to interact with your model, send input data for prediction, and receive the model’s output. You can manage and monitor the deployed model, scale it based on demand, and update it with new versions as you iterate on model improvements.
In addition to these tasks, Azure Machine Learning Studio provides a collection of sample notebooks to help you get started quickly. These notebooks cover a range of topics and scenarios, including training and deploying models for image classification, distributed GPU training, and creating production pipelines for tasks such as credit default prediction. These samples serve as valuable references and can accelerate your understanding and implementation of machine learning workflows.
By following these steps within your Azure Machine Learning workspace and exploring the available sample notebooks, you can leverage the capabilities and features provided by Azure Machine Learning Studio to build, train, deploy, and manage your machine learning models effectively.
Creating Components & Resources within Azure Machine Learning Studio
The following options allow you to create various components and resources within Azure Machine Learning Studio, empowering you to build, deploy, and manage your machine learning projects effectively.
- Automated ML Job: Create a new automated machine learning job for efficient model selection and tuning.
- Component: Develop a new reusable component for building modular machine learning workflows.
- Compute Cluster: Provision a new compute cluster for scalable and distributed model training.
- Compute Instance: Create a new compute instance to interactively develop and run experiments in a Jupyter notebook environment.
- Data Asset: Define a new data asset to organize and manage datasets within your workspace.
- Data Labelling Project: Initiate a new data labelling project to annotate and label data for supervised learning tasks.
- Datastore: Set up a new datastore to securely store and access your data within the Azure Machine Learning workspace.
- Endpoint: Establish a new endpoint to deploy and serve your trained machine learning models as web services.
- Environment: Create a new environment with specific dependencies and configurations for reproducible machine learning experiments.
- Model: Generate a new model artifact that encapsulates the trained parameters and metadata of your machine learning model.
- Notebook: Start a new notebook for interactive development, data exploration, and experiment execution in a collaborative environment.
- Pipeline: Design a new pipeline to orchestrate and automate end-to-end machine learning workflows, including data preparation, training, and deployment.
Conclusion
Azure Machine Learning Studio provides a powerful platform for building, training, and deploying machine learning models. By following the steps outlined in this guide, you have learned how to set up your workspace and navigate the Studio, while creating essential components and resources. This includes adding compute, connecting data, training models, and deploying endpoints. Leveraging the rich ecosystem of Azure Machine Learning Studio, including sample notebooks and community resources, will further enhance your machine learning capabilities.
With Azure Machine Learning Studio, we have the tools and flexibility to streamline our machine learning workflows, collaborate effectively, and unlock the full potential of our data. Lets get started to transform our data into valuable insights, predictions, and innovations, and embark on the path to building intelligent applications. Please feel free to reach out for demonstration or any clarifications.
- Coefficient of Variation in Regression Modelling: Example - November 9, 2025
- Chunking Strategies for RAG with Examples - November 2, 2025
- RAG Pipeline: 6 Steps for Creating Naive RAG App - November 1, 2025
I found it very helpful. However the differences are not too understandable for me