Following are the key points described later in this article:
- What is Angular-Seed project?
- Pre-requisites for installing Angular Seed Project
- Install and Configure Angular-Seed Project
- Hello World – Code Example
If you are an AngularJS beginner or have started developing angular apps and, have been wondering about the standard folder structure layout to put your HTML, CSS and JS files, you would want to consider Angular-Seed project. Angular seed project can be seen as a template or kick-starter project that could be installed to get started with your Angular apps. It comes with some of the following:
- Folder structure layout for storing your HTML, CSS and JS files
- A single page app, by default, consisting of a main page and two views, view1 and view2, to get you quickly started with SPA.
- All the necessary angularJS files that could be found within app/bower_components after the installation is done.
- Unit test tools installed and configured
- Sample unit tests for views, view1 and view2 to get you started quickly with unit tests
- End-to-end tests
Pre-requisites for installing Angular Seed Project
- Install Git. Once done, you should be able to open the Git console and work from there.
- Install node.js and its package manager (npm). This would be required because number of node.js tools have been used to initialize and test angular-seed.
Get more details on Angular-Seed project page.
Install and Configure Angular-Seed Project
- Open git console. Create a folder, maybe ngworkspace, and go within that folder. Type “git clone https://github.com/angular/angular-seed.git”. This would create a folder angular-seed with several files and folder within.
- Go to angular-seed folder (cd angular-seed)
- Type “npm install” to install tools and angular framework code (angularJS libraries). You would find following two folders created:
- node_modules – contains the npm packages for the tools we need
- app/bower_components – contains the angular framework files
- Once done with above, start the server with command, “npm start”.
- Goto a browser and type “http://localhost:8000/app/index.html”
- You would see angular app with two views, view1 and view2 and default page redirected to View1.
Hello World – Code Example
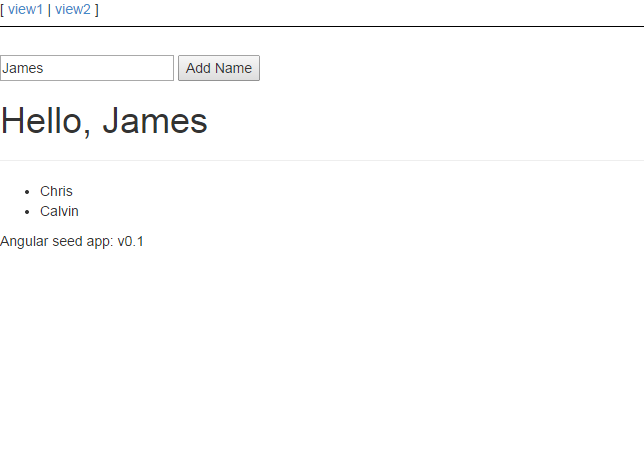
Once installed angular-seed project, lets do a quick hello world and a sample program to demonstrate ng-repeat.
- Open app/view1/view1.html. Paste the following code . Pay attention to some of the following:
- Usage of ng-model directive to bind name with input field.
- Usage of ng-click directive to associate addName() event
- Usage of template between {\{name}}
- Usage of ng-repeat directive to display name items
<input type="text" ng-model="name" placeholder="Type your name here"/> <input type="button" value="Add Name" ng-click="addName()"/> <br/> <h1>Hello, {{name}}</h1> <hr/> <ul> <li ng-repeat="nm in names">{{nm.name}}</li> </ul> - Open app/view1/views1.js. Paste the code below. Pay attention to some of the following:
- $scope injected within controller
- Attributes such as name, names attached to the $scope object
- Method such as addName is attached to $scope object
'use strict';

angular.module('myApp.view1', ['ngRoute'])

.config(['$routeProvider', function($routeProvider) {
  $routeProvider.when('/view1', {
    templateUrl: 'view1/view1.html',
    controller: 'View1Ctrl'
  });
}])

.controller('View1Ctrl', [ '$scope', function($scope) {
	$scope.name = '';
	$scope.names = [{name:"Chris"}, {name:"Calvin"}];
	$scope.addName = function() {
		$scope.names.push( {'name':$scope.name} );
		$scope.name = '';
	};
}]);
Following is how it would look like after following above instructions and typing name, James in the textfield.
Check the Hello-AngularJS tutorials website for multiple tutorials on AngularJS presented along with code samples.
- The Watermelon Effect: When Green Metrics Lie - January 25, 2026
- Coefficient of Variation in Regression Modelling: Example - November 9, 2025
- Chunking Strategies for RAG with Examples - November 2, 2025


I found it very helpful. However the differences are not too understandable for me