In this post, you will learning about concepts about machine learning (ML) pipeline and how to build ML pipeline using Python Sklearn Pipeline (sklearn.pipeline) package. Getting to know how to use Sklearn.pipeline effectively for training/testing machine learning models will help automate various different activities such as feature scaling, feature selection / extraction and training/testing the models. It is recommended for data scientists (Python) to get a good understanding of Sklearn.pipeline.
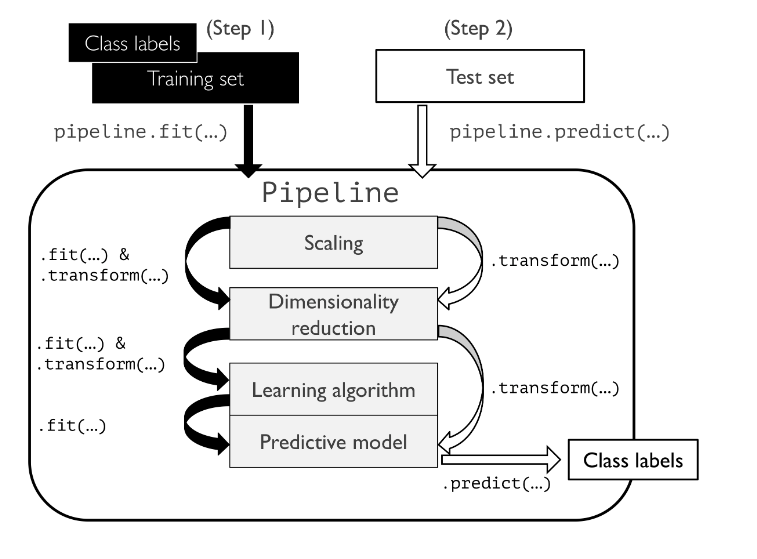
Machine Learning (ML) pipeline, theoretically, represents different steps including data transformation and prediction through which data passes. The outcome of the pipeline is the trained model which can be used for making the predictions. Sklearn.pipeline is a Python implementation of ML pipeline. Instead of going through the model fitting and data transformation steps for the training and test datasets separately, you can use Sklearn.pipeline to automate these steps. Here is a diagram representing a pipeline for training a machine learning model based on supervised learning. Make the note of some of the following in relation to Sklearn implementation of pipeline:
Here is how the above pipeline will look like, for test data. Pay attention to some of the following in the diagram given below:
Here is the Python code example for creating Sklearn Pipeline, fitting the pipeline and using the pipeline for prediction. The following are some of the points covered in the code below:
import pandas as pd
from sklearn.preprocessing import LabelEncoder
from sklearn.model_selection import train_test_split
from sklearn.preprocessing import StandardScaler
from sklearn.decomposition import PCA
from sklearn.ensemble import RandomForestClassifier
from sklearn.pipeline import make_pipeline

df = pd.read_csv('https://archive.ics.uci.edu/ml/'
                 'machine-learning-databases'
                 '/breast-cancer-wisconsin/wdbc.data', header=None)
#
# Encode the label using LabelEncoder
#
X = df.loc[:, 2:].values
y = df.loc[:, 1].values
le = LabelEncoder()
y = le.fit_transform(y)
#
# Create training and test data
#
X_train, X_test, y_train, y_test = train_test_split(X, y, test_size=0.20, stratify=y, random_state=1)
#
#v Create a pipeline and fit the model
#
pipe_lr = make_pipeline(StandardScaler(),
                        PCA(n_components=2),
                        RandomForestClassifier(criterion='gini', n_estimators=50, max_depth=5, random_state=1))

pipe_lr.fit(X_train, y_train)
y_pred = pipe_lr.predict(X_test)
test_acc = pipe_lr.score(X_test, y_test)
print(f'Test accuracy: {test_acc:.3f}')
The diagram below represents how the pipeline works:
Note how different steps are implemented using the pipeline. The above steps are passed as arguments in make_pipeline method.
Here is the summary of what you learned:
Last updated: 3rd May, 2024 Have you ever wondered why some machine learning models perform…
Last updated: 2nd May, 2024 The success of machine learning models often depends on the…
When working on a machine learning project, one of the key challenges faced by data…
Last updated: 1st May, 2024 The bias-variance trade-off is a fundamental concept in machine learning…
Last updated: 1st May, 2024 As a data scientist, understanding the nuances of various cost…
Last updated: 1st May, 2024 In this post, you will learn the concepts related to…