With the increase in password theft, phishing attacks and other hacking techniques, the conventional text based user name and password based authentication seem to be insufficient because of the rapid rise of network level threats. The traditional way of just memorizing the password to validate one’s identity is not enough and web sites and applications are now expecting one to possess email Id or a smartphone to communicate with another short-lived randomized password, One Time Password (OTP), as one more factor to the authentication. Here we will discuss the approach to generate the OTP and use it for the two factor authentication technique. In the next article, we’ll discuss the implementation of the OTP using the Spring Security framework.
One Time Password, as the name suggests, can be used only once and are generally time bound. While this poses some challenge to the hackers, but, the algorithm and authentication protocol to generate and authenticate the OTP will define the real challenge. There can be various ways to generate the OTP but we’ll discuss here the standard based approach using HMAC based One-Time Password (HOTP) algorithm based on RFC 4226 to support event based moving factor. A time-based variant of the same algorithm provides short-lived OTP values based on RFC 6238 (TOTP), which are desirable for enhanced security of the application using two factor authentications. The steps to generate the OTP as per the specification are:
One can implement the RFC 6238 specification by following the above steps and generate the OTP to be used for the two-factor authentication. The alternate way could be to use the implementation provided by Google as service and generate the OTP as Google Authenticator, a six digit token.
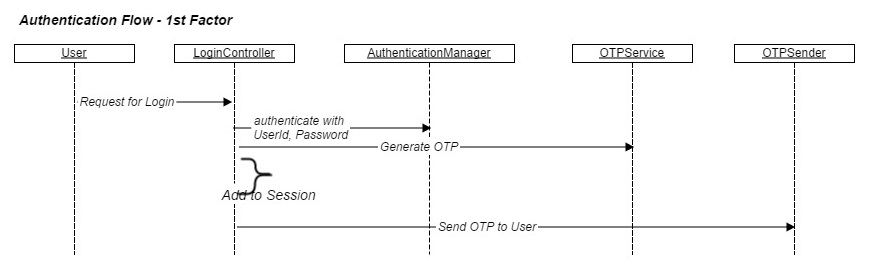
The first approach in the implementation of the two factor authentication mechanism is to authenticate the first factor using the conventional Username and Password based authentication. There needs to be an authentication manager which will authenticate against the User data store such as LDAP, database or any other service storing the user credentials. The OTP service will generate an OTP using the algorithm as per TOTP algorithm defined above which can be stored in user session or the persistent store. The generated authentication token can be sent using the OTP sender service on the smartphone or the email. The sequence diagram below depicts the entire flow of the first factor authentication and OTP generation.
The flow in the above sequence diagram is:
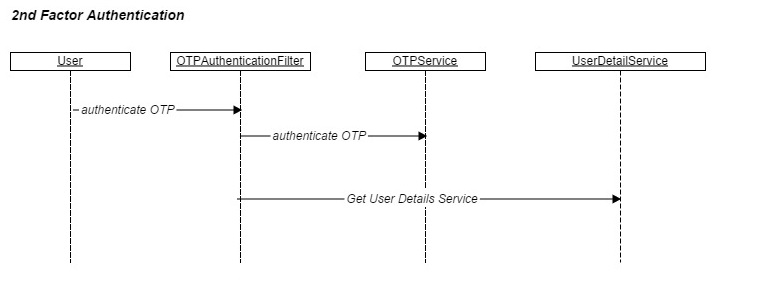
The second step in the entire flow is to validate the OTP token provided by user. The OTP authentication filter authenticates the token and if the token is valid and matches against the one stored in the user session or the persistent store, it provides the access to the protected resources. The steps to complete the 2nd factor authentication flow are:
Two Factor flow can be implemented using any standard security framework. We’ll provide the Spring Security and JEE related implementation in the next article.
Last updated: 28th April, 2024 As a data scientist, understanding the nuances of various cost…
Last updated: 28th April, 2024 In this post, you will learn the concepts related to…
Last updated: 26th April, 2024 In this blog post, we will discuss the logistic regression…
Last updated: 22nd April, 2024 As data scientists, we navigate a sea of metrics to…
Last updated: 22nd April, 2024 This post will teach you about the gradient descent algorithm…
Last updated: 19th April, 2024 Among the terminologies used in training machine learning models, the…
View Comments
Have you posted the second part to this post (Spring configuration for one time password implementation)? I am looking to implement this shortly and have been hunting around for a good guide. I am actually doing this via Grails, but using Spring Security under the covers.
Thank you!
Great Article - Any update on this? Looking forward to see Part 2.
Can you please share the link for part 2.
great article. upload part2 Spring Security and JEE related implementation .
thank you
Please give me a simple answer to a simple question:
tell me where am I supposed to put the otp I am given when I am trying to sign in to my account?
w