In this post, you will learn about boosting technique and adaboost algorithm with the help of Python example. You will also learn about the concept of boosting in general. Boosting classifiers are a class of ensemble-based machine learning algorithms which helps in variance reduction. It is very important for you as data scientist to learn both bagging and boosting techniques for solving classification problems. Check my post on bagging – Bagging Classifier explained with Python example for learning more about bagging technique. The following represents some of the topics covered in this post:
As like bagging, Boosting is an ensemble method which makes use of a unique sampling technique for creating an ensemble classifier. In boosting technique, the data for the training is resampled and combined in an adaptive manner such that the weights in the resampling are increased for those data points which got mis-classified more often. In other words, the data points get combined to create new sample while assigning more weights to misclassified data points. Boosting is found to be more effective in variance reduction than bagging. The variance reduction comes from the aspect of adaptive resampling.
As like bagging, boosting technique is very effective for the classifiers which are found to have high variance. For example, decision tree classifier. For stable classifiers built using algorithm such as K-NN (K-nearest neighbours) or linear discriminant analysis (LDA) which are found to have low variance, bagging or boosting may not have much impact.
Adaptive boosting (also called as AdaBoost) is one of the most commonly used implementation of boosting ensemble method. Adapting boosting combines (boosts) the weak learners to form a strong learner. Here is a diagram used for illustrating boosting classification technique:
From the above diagram, lets understand how adaptive boosting classifier works by ensembling three classifiers (classifier 1, 2 and 3).
Adaboost classifier can use base estimator from decision tree classifier to Logistic regression classifier. As described above, the adaboost algorithm begins by fitting the base classifier on the original dataset. Subsequently, the additional copies of the same base classifier is fitted on the same dataset but the weights of incorrectly classified instances by the previous classifier are adjusted such that subsequent classifiers focus more on difficult cases.
The classifiers used for training are called as weak classifiers. These are called weak classifiers because they perform better than the random guessing but still classifies the data in poor manner.
With decision tree, the weak classifiers used in adaboost classifier are decision stumps. The decision stumps are nothing but a tree with one node and two leaves. Adaboost classifier represents a forest of such decision stumps. The decision stump makes use of just one feature or variable to make the decision. These decision stumps are not great at making accurate classifications. Full-size decision trees or random forest makes use of all variables to make a decision while decision stumps make use of just one variable to make a decision. This is why decision stumps are called as weak learners.
Decision stumps used in AdaBoost classifier are different from decision trees in Random Forest in the sense that some decision stumps may have higher say or weight in the final classification. In Random Forest, each decision tree have equal weight or say in final classification.
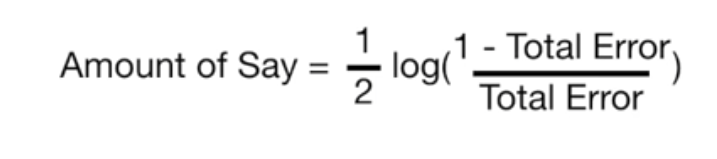
The weight or the amount of say that each decision stump will have in final decision can be calculated using the following formula:
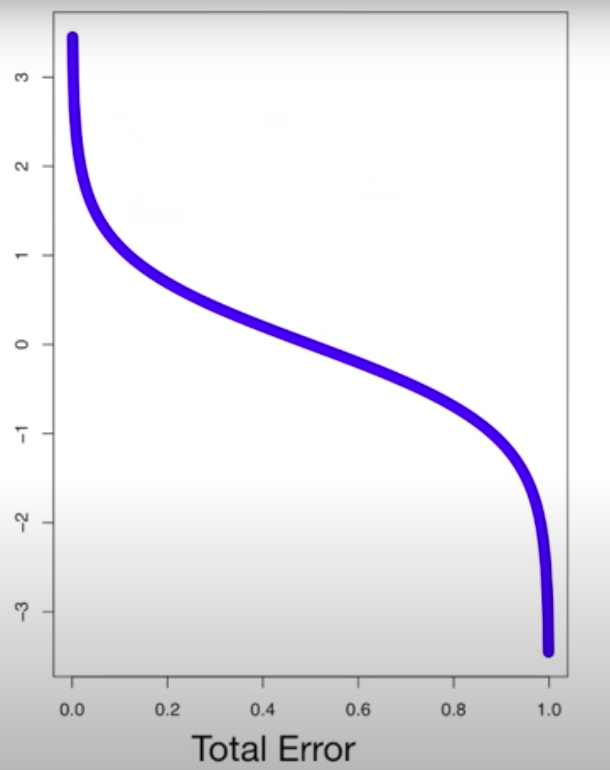
The plot of weight or amount of say vs total error made by a decision stump will look like the following. Lesser is the total error, higher is the weight or amount of say by each decision stump.
The training data used in subsequent decision stumps have some of the data set assigned higher weights than the others. The weights assigned to to the training data is a function of misclassification and weight of the classifier. Those data set which got classified correctly will have its weight reduced and those data set which got classified incorrectly will get its weight bumped up. The new sample weight for mis-classified data set can be expressed as the following:
New sample weight = old sample weight * e^classifierWeight
or
New sample weight = old sample weight * e^amountOfSay
The new sample weight for correctly classified data can be calculated as the following:
New sample weight = old sample weight * e^-classifierWeight
or
New sample weight = old sample weight * e^-amountOfSay
Based on new weights assigned to training data, the new data sample is created. It is likely that the training data having high weight (mis-classified) will be picked up multiple times and hence, new data sample will have duplicate copies of mis-classified data.
An AdaBoost classifier is an ensemble meta-estimator that is created using multiple versions of classifier trained using a base estimator. The first version of classifier gets trained on the original dataset. The later versions get trained on the same dataset but the weights of incorrectly classified instances are adjusted such that subsequent classifiers focus more on difficult cases.
In this section, Sklearn.ensemble AdaBoostClassifier is used for illustrating the AdaBoost classifier. Two models have been fit for illustration purposes. One model is fit using DecisionTreeClassifier and other is fit using AdaBoostClassifier with base estimator used as DecisionTreeClassifier. You will see that the ensemble model trained using AdaBoostClasssifier has a higher accuracy and better generalization performance (test accuracy is greater than training accuracy).
Here is the Python code for model which is fit using Sklearn.tree DecisionTreeClassifier. The tree is a decision stump with the max_depth set to 1.
from sklearn import datasets
from sklearn.model_selection import train_test_split
from sklearn.preprocessing import StandardScaler
from sklearn.svm import SVC
from sklearn.tree import DecisionTreeClassifier
from sklearn.pipeline import make_pipeline
from sklearn.ensemble import AdaBoostClassifier
#
# Load the breast cancer dataset
#
bc = datasets.load_breast_cancer()
X = bc.data
y = bc.target
#
# Create training and test split
#
X_train, X_test, y_train, y_test = train_test_split(X, y, test_size=0.25, random_state=1, stratify=y)
#
# Pipeline Estimator
#
pipeline = make_pipeline(StandardScaler(),
                        DecisionTreeClassifier(criterion='entropy', max_depth=1, random_state=1))
#
# Fit the model
#
pipeline.fit(X_train, y_train)
#
# Model scores on test and training data
#
print('Model test Score: %.3f, ' %pipeline.score(X_test, y_test),
      'Model training Score: %.3f' %pipeline.score(X_train, y_train))
The accuracy of the model comes out to be 91.6% for test data set and 91.5% for the training data set. Good model with with decent generalization performance. In the following section, we will see how does the model performance look like for model trained using AdaBoostClassifier.
Here is the code for model fit using sklearn.ensemble AdaBoostClassifier. Pay attention to some of the following:
#
# Standardize the dataset
#
sc = StandardScaler()
X_train_std = sc.fit_transform(X_train)
X_test_std = sc.transform(X_test)
#
# Creating a decision tree classifier instance
#
dtree = DecisionTreeClassifier(criterion='entropy', max_depth=1, random_state=1)
#
# Instantiate the bagging classifier
#
adbclassifier = AdaBoostClassifier(base_estimator=dtree,
                                   n_estimators=100,
                                   learning_rate=0.0005,
                                   algorithm = 'SAMME',
                                   random_state=1)
#
# Fit the AdaBoost classifier
#
adbclassifier.fit(X_train, y_train)
#
# Model scores on test and training data
#
print('Model test Score: %.3f, ' %adbclassifier.score(X_test, y_test),
      'Model training Score: %.3f' %adbclassifier.score(X_train, y_train))
The accuracy of the model comes out to be 93.7% for test data set and 92.3% for the training data set. Better model with with better generalization performance than DecisionTreeClassifier.
Here is a great tutorial video on AdaBoost algorithm:
In this post, you learned some of the following concepts in relation to boosting and adaboost algorithm:
Last updated: 15th May, 2024 Have you ever wondered how your bank decides what to…
In this fast-changing world, the ability to learn effectively is more valuable than ever. Whether…
Last updated: 13th May, 2024 Whether you are a researcher, data analyst, or data scientist,…
Last updated: 12th May, 2024 Data lakehouses are a relatively new concept in the data…
Last updated: 12th May 2024 In this blog, we get an overview of the machine…
Last updated: 12th May, 2024 In the world of generative AI models, autoencoders (AE) and…